Skip to content
Calgary Parging official logo

November 11, 2026

What stucco repair around a window really looks like, step by step.

Your wall will look worse before it looks better. That is the repair working.

Window waterproofing is the membrane, flashing tape and building paper that seal the joint between a window and the stucco. Stucco sheds rain; those layers keep water out, so we rebuild all of them instead of patching over damage. Every step below was photographed on two windows of a multi-storey Calgary building.

Blue self-adhered waterproofing membrane and 3M flashing tape sealing a window nail flange before stucco repair Colour-matched textured stucco finish blended around a window after repair, Calgary Before After
Day one membrane vs the finished wall.

Step 1 of 6

We cut the stucco back to a clean square.

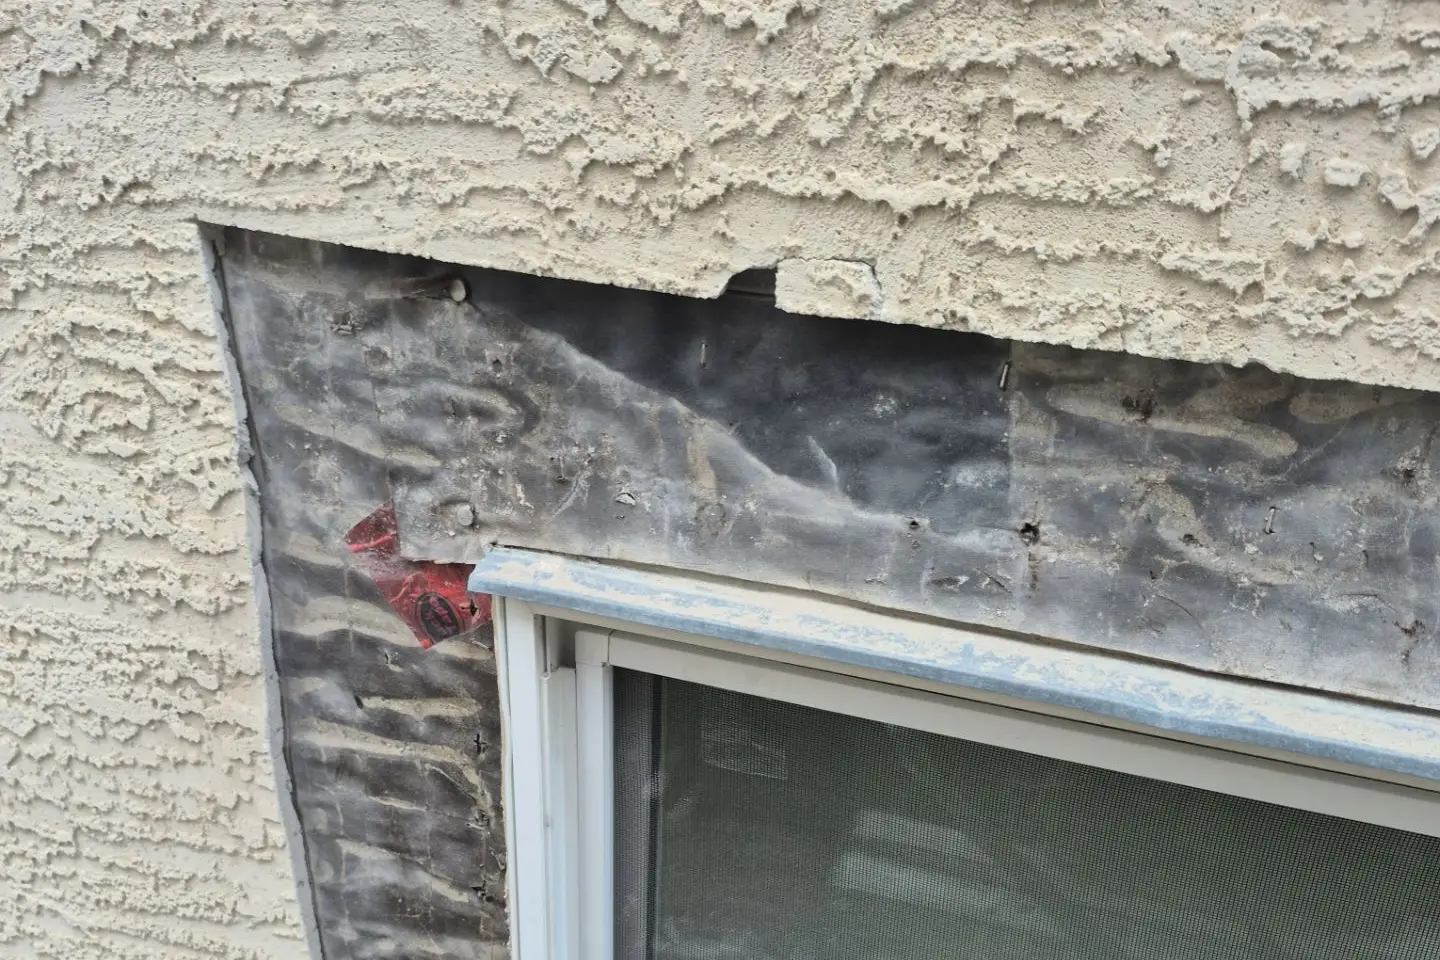
The repair starts with a saw, not a trowel. Our crew flush-cuts the stucco back to solid material around the full window perimeter, clears the debris and trims the old building paper back to a clean lap. The open band around the window only lasts a few hours, but it is the stage that looks the most alarming from the sidewalk. Cutting back to a square gives the new layers a straight edge to lap into, so the patch locks into the wall instead of sitting on top of it.

Our take: half the leaky patches we tear out failed because someone skipped this cut and troweled over crumbling edges.

Next up: sealing the window itself.

Textured stucco flush-cut to a clean square around a window, exposing the existing building paper, Calgary stucco repair
Photo 01. Stucco cut back square around the window, with around 4 to 5 inches of the old paper left exposed for the new layers to lap into.

Step 2 of 6

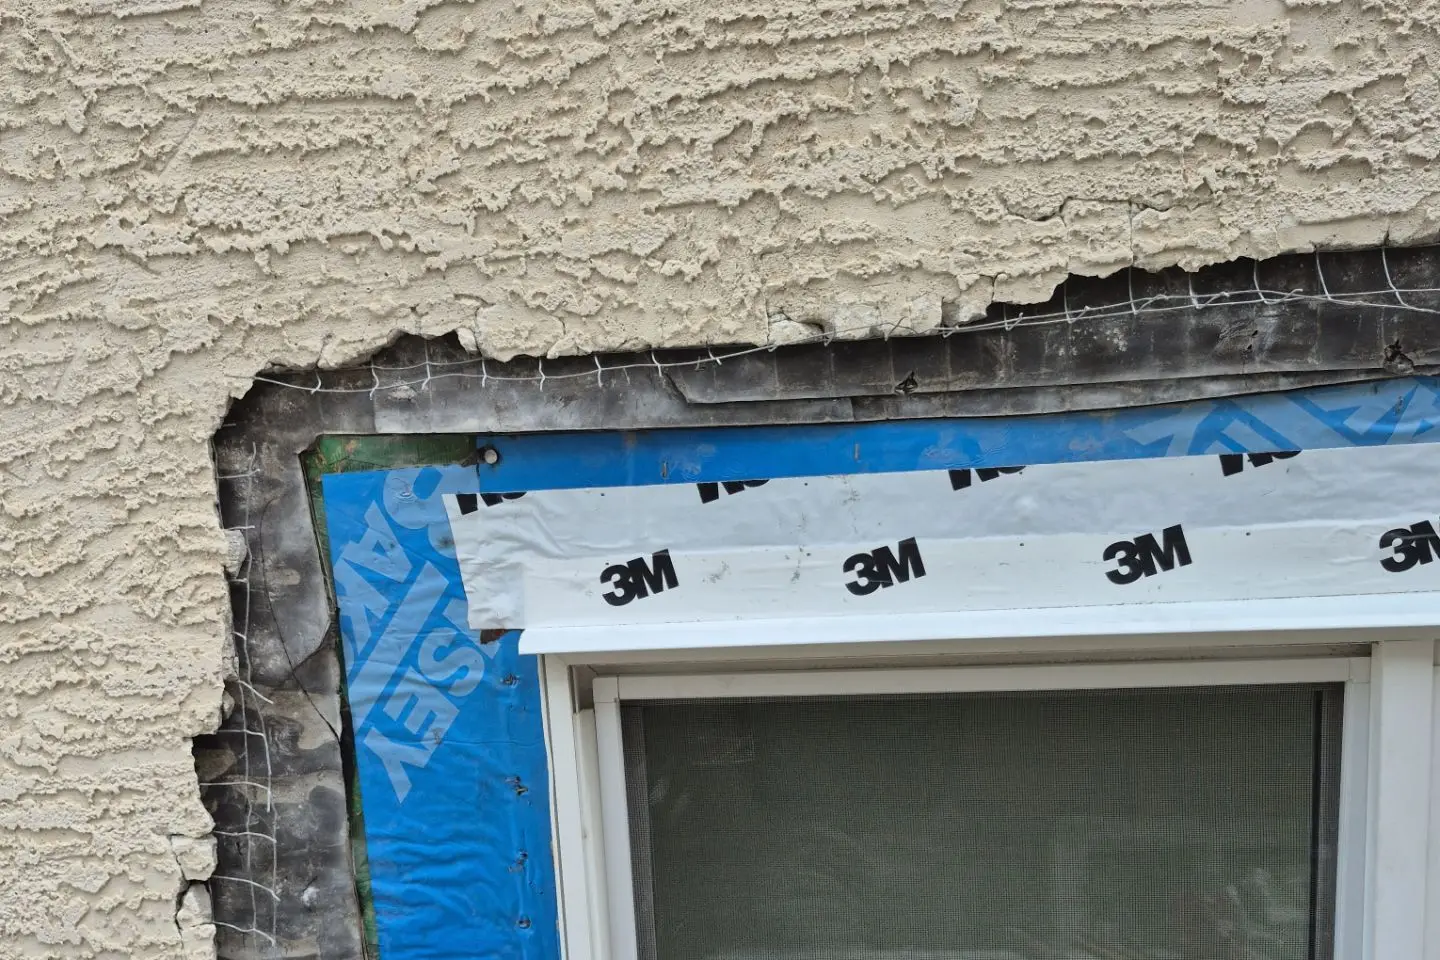
We seal the window flange with self-adhered membrane and flashing tape.

This is the layer that actually stops the leak. A self-adhered membrane, Blueskin or 3M depending on the job, wraps the window opening, and 3M flashing tape seals it over the window’s nail flange. Every piece overlaps the one below it, shingle style, so any water that gets this far runs down and out, never inward. The membrane bonds directly to the sheathing, which is why we needed bare, solid material in Step 1.

Our take: if a quote never mentions membrane or flashing tape, you are buying a patch, not a repair.

Next up: giving the wall its paper back.

Blue self-adhered waterproofing membrane and 3M flashing tape sealing a window nail flange before stucco repair
Photo 02. Blue self-adhered membrane and 3M flashing tape tied into the window flange. Shingle overlap, always.

Step 3 of 6

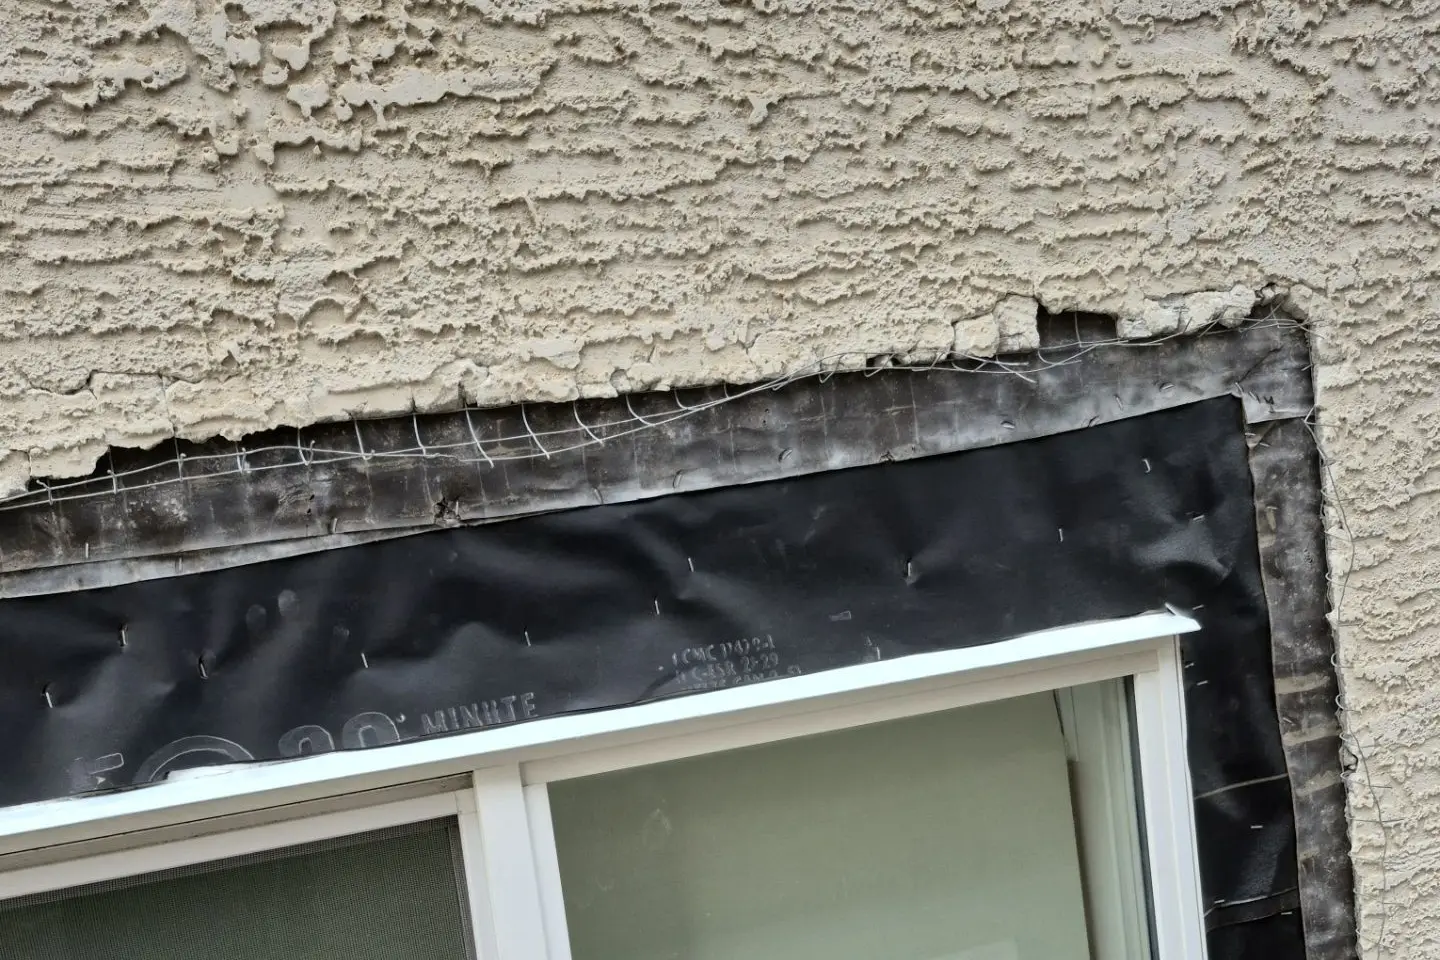
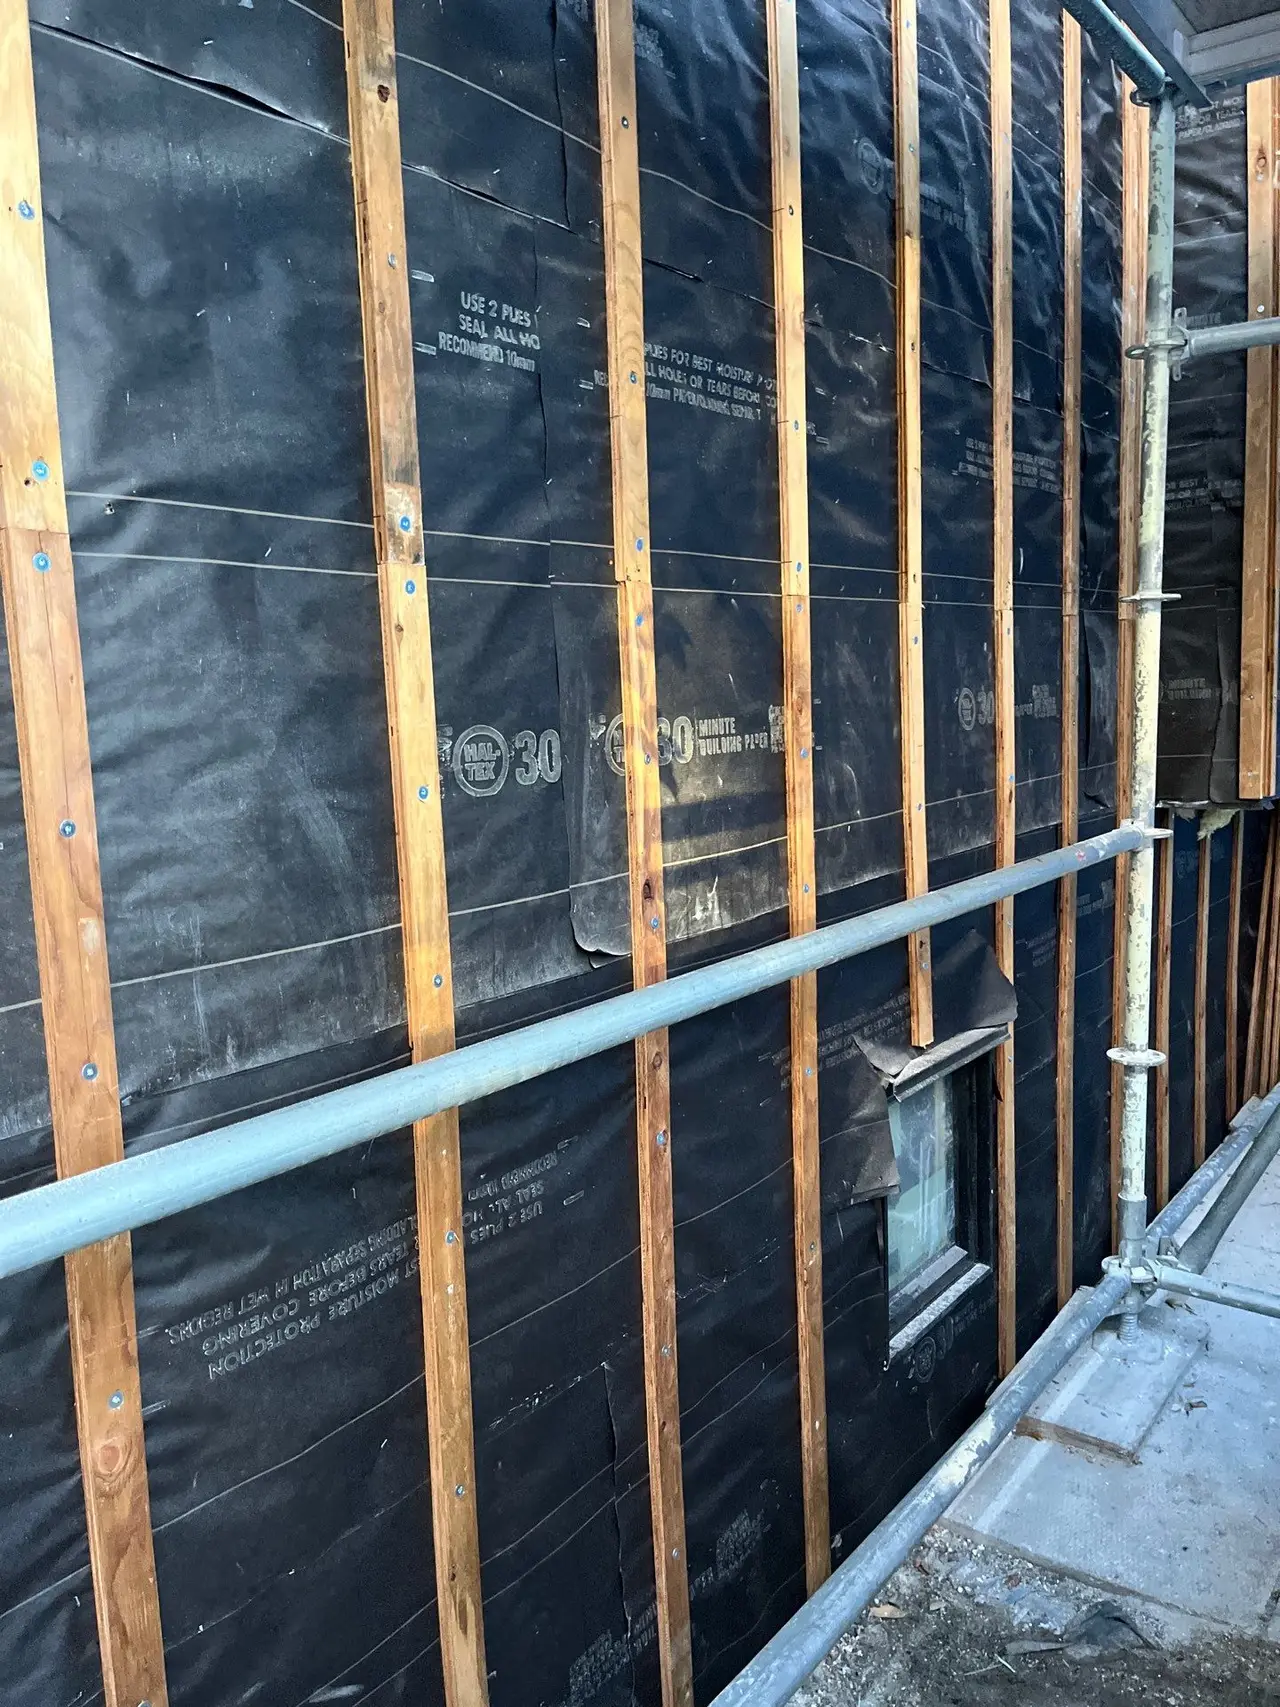
We lap new building paper into the existing barrier.

New paper tucks under old paper above, over old paper below. Two layers of building paper go over the membrane and lap into the existing moisture barrier around the patch. Above the window, the existing paper laps over the new. Below it, the new laps over the old. Gravity does the rest. An aluminum head flashing over the window kicks water away from the joint, white on lighter stucco and black where the window frames are dark, so it disappears into the wall.

Our take: lap order is where DIY repairs die. Get it backwards and the wall drinks instead of drains.

Next up: giving the stucco something to grab.

New black building paper lapped into existing moisture barrier around a window during stucco repair in Calgary
Photo 03. New building paper stapled and lapped into the existing barrier around the second window. Order of overlap decides whether a wall drains or soaks.

Step 4 of 6

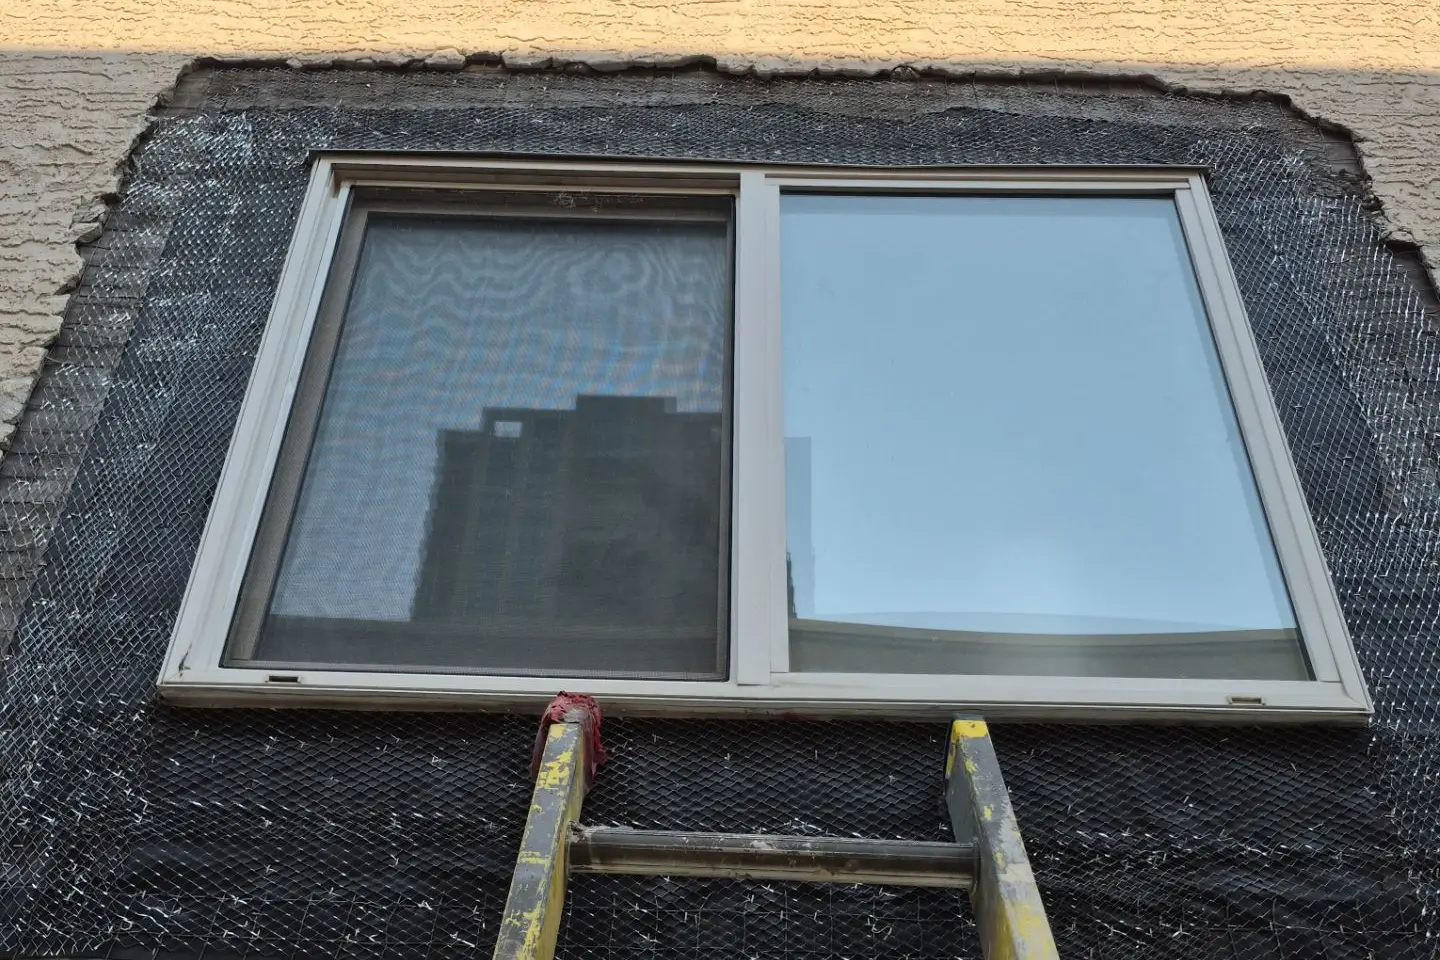
We fasten new wire lath into the existing mesh.

Stucco needs something to grab. Lath is its skeleton. Galvanized wire lath covers the paper and laps into the existing mesh at every edge, fastened through to the framing. Tying new lath into old is what lets the fresh stucco move with the wall as one piece, so the patch line does not telegraph through the finish later.

Our take: we would rather spend an extra hour tying lath than come back in two winters for a cracked patch line.

Next up: cement, in three coats.

Galvanized wire lath fastened over building paper around a window, lapped into existing stucco mesh
Photo 04. New wire lath lapped into the existing mesh around the window. The patch now moves with the wall, not against it.

Step 5 of 6

We build the base: scratch coat, then brown coat.

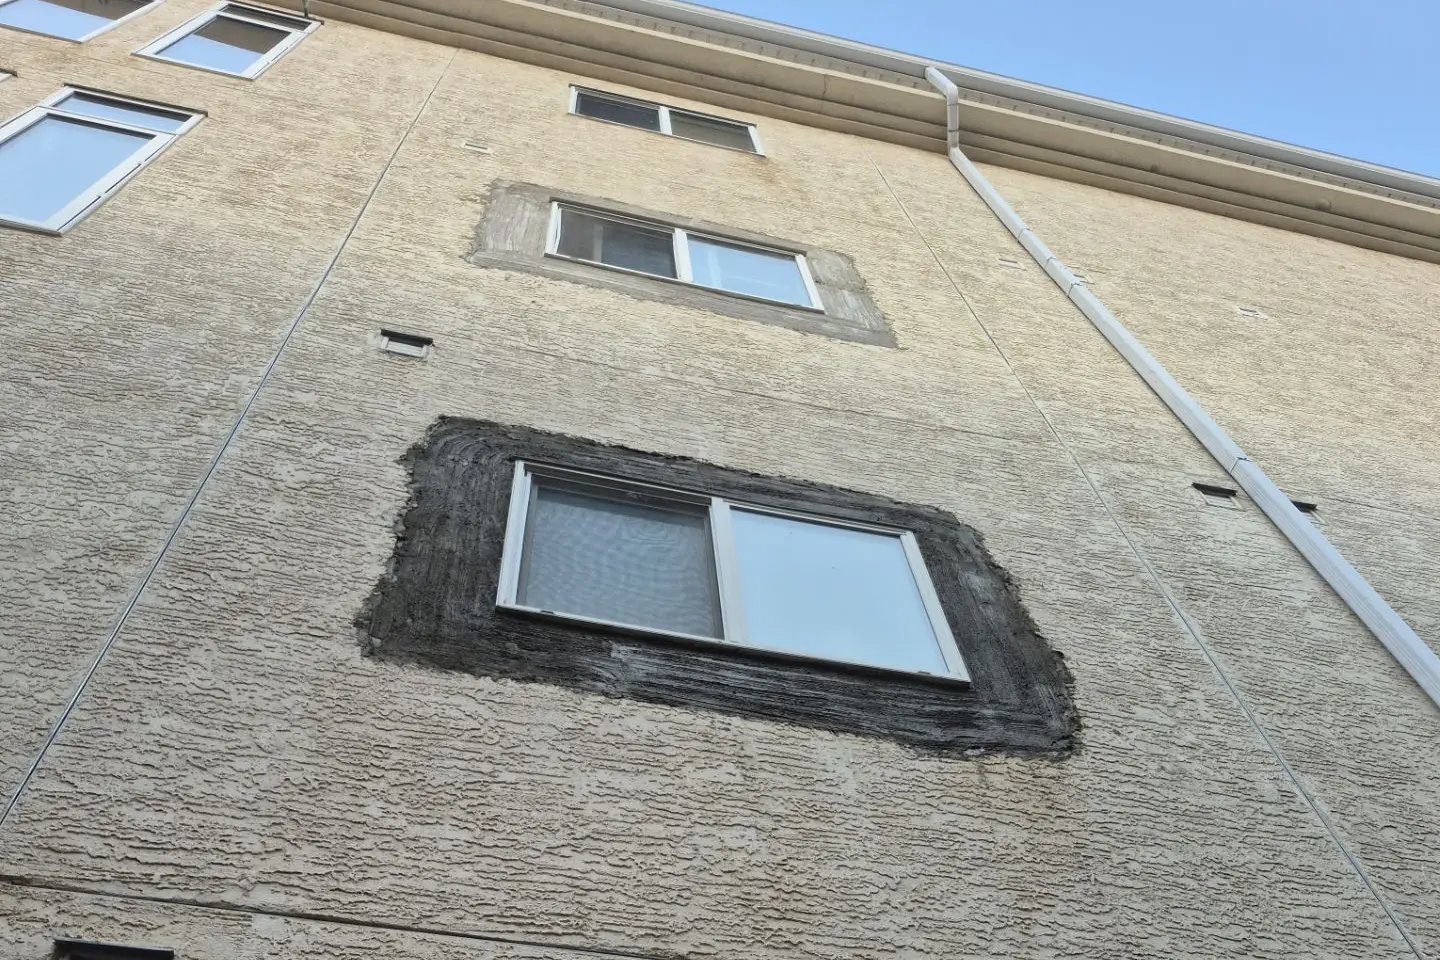
The dark band around your window at this stage is wet cement, not a problem. The scratch coat goes on the same day as the lath. It presses through the mesh and gets raked with grooves so the next coat can grip. The brown coat follows and gets levelled flat to match the wall plane. Each coat needs days to cure before the next, and base coats look dark grey while they hold moisture. On this job you can see both stages at once: a fresh scratch coat around the second-storey window and a curing brown coat around the third-storey window above it.

Our take: this is the ugliest week of the job and the most important one after the membrane. Rushing the cure here is how patches fail.

Next up: making the repair disappear.

Scratch coat and brown coat stages around two windows on a multi-storey Calgary building during stucco repair
Photo 05. Scratch coat around the lower window, brown coat curing around the upper one. This is the stage that triggers the most phone calls. It is supposed to look like this.

Step 6 of 6

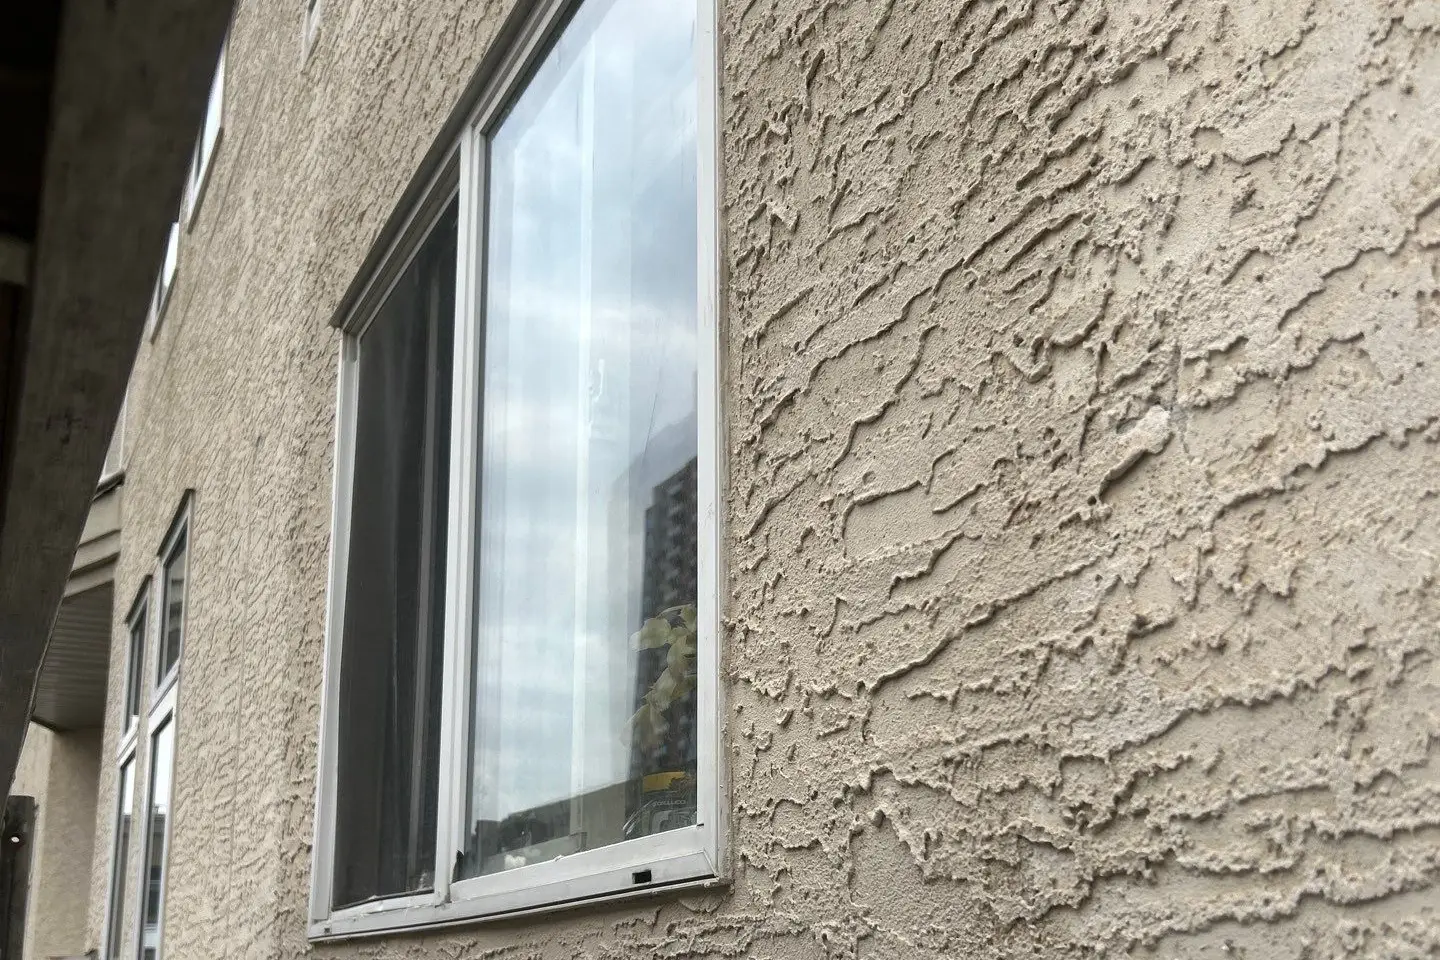
We match the colour and texture of your existing wall.

Done right, you stop being able to point at the repair. The finish coat gets colour-matched and hand-textured to blend into the surrounding stucco. Expect the patch to read slightly fresh for the first few weeks, longer on a heavily weathered wall, while the finish cures and weathers to match the rest of the wall. That evening-out is normal, and it is the last stage of the repair you will notice.

Our take: a colour match you can spot from the street is a redo in our books.

Here is the whole job at a glance.

Colour-matched textured stucco finish blended around a window after repair, Calgary
Photo 06. Colour-matched textured finish around the window. The repair is under there. Good luck finding it.

What to expect while we are on your wall

Stage What you will see How long
Cut-back, membrane, flashing, paper, lath and scratch coat An open band around the window in the morning, a dark grey grooved band by the end of the day Day 1, one visit
Scratch coat curing Dark grey, grooved surface About 2 days
Brown coat Flat grey band, lighter as it dries Cures about 7 days
Finish coat Texture and colour match Blends in over weeks to months, depending on how weathered the wall is

Cold weather stretches these times. Stucco cures properly above 5°C, so late-season repairs may need heated hoarding.

Our take: booking before the snow beats paying for hoarding.

Next up: the questions we get asked mid-job.

Questions homeowners ask us mid-repair

Can water get behind stucco?

Yes, and around windows is the most common way in. Cracked stucco, failed caulking and missing flashing all let water reach the paper behind. If the paper is torn or lapped wrong, if the window flashing membrane is missing, or around perforations such as vents, pipes and screw holes, water reaches the sheathing, and that is when repairs get expensive.

Does new stucco stick to old stucco?

New stucco bonds to lath, not to old stucco. That is why we cut back to a clean edge and tie new lath into the existing mesh instead of skimming fresh material over a damaged surface.

Why does my patch look darker than the wall?

Base coats hold moisture and read dark grey until they cure. The finish coat then needs weeks, months or even a full winter or summer to weather in. How long depends on how weathered the existing stucco is: a newer wall blends in quickly, an older sun-beaten wall takes longer. If the colour still stands out after a season, call us and we will look at it.

Is it normal for the base coat to show hairline cracks?

Hairline shrinkage cracks in a scratch coat are normal. The brown and finish coats cover them. Cracks in your finished wall are a different story, and worth a photo to us either way.

The ugly middle is what a dry wall costs.

Every layer in Steps 2 to 4 disappears behind the finish, and those hidden layers are the whole difference between a repair that lasts and a patch that leaks. Calgary Parging has rebuilt window perimeters this way across Calgary, Airdrie and High River since 2012, backed by a written warranty. Most window-perimeter stucco repairs in the Calgary Metropolitan Area run $975 to $3,000, and our stucco repair cost guide breaks down what moves the number.

Want your windows sealed before the next freeze-thaw cycle?
Book in less than 60 sec

Ready to get a free, no-obligation estimate?

On-site quote in under 60 seconds to request. We cover Calgary, Airdrie, High River and surrounding areas.

Book Free Estimate Call (403) 727-4464

Mon – Sun: 7am – 7pm

Call now