Most stucco in Calgary is bonded straight to the wall. Paper on the sheathing, lath on the paper, three coats of stucco on the lath. Nothing separates the cladding from the layer that keeps water out.
So when water gets past the stucco, and it always does eventually, it has nowhere to go but sideways into your sheathing.
In 2025 Read Jones Christoffersen Ltd. (RJC), a Calgary engineering firm, specified the alternative on a Beltline walk-up. We took photographs the whole time the wall was open. Here’s that wall, layer by layer.
What is a rainscreen stucco wall?
A rainscreen stucco wall is a stucco wall with a deliberate air gap between the stucco and the weather barrier behind it. That gap drains water downward and lets air move through, so the wall dries out instead of holding moisture against your sheathing.
Building science splits an exterior wall into two lines of defence. Your stucco is the first plane of protection. It deflects rain, but it isn’t waterproof, and it was never meant to be. The building paper behind it is the second plane of protection, also called the drainage plane. Its job is to catch whatever gets past the stucco and send it back outside.
A conventional stucco wall presses those two planes together. A rainscreen wall separates them.
That’s it. That’s the whole difference, and it’s worth about 20mm.
Why does stucco need a rainscreen more than vinyl or lap siding does?
Stucco is dense, low in air permeability and slow to dry, so water that gets behind it just stays there. Vinyl siding actually lets more water in, but it also has open joints and a loose fit, so air circulates and the wall dries itself. Stucco has neither.
Picture a standard 60 inch by 60 inch window with a 1/8 inch gap around the perimeter. Add up all four sides and you’ve got roughly 30 square inches of opening.
On a vinyl-clad wall, nobody loses sleep over it. There’s drainage everywhere and constant airflow. Put that same window in a face-bonded stucco wall with no cavity and those 30 square inches turn into a real problem, because water enters faster than the wall can drain it. Pressure builds behind the cladding and pushes water sideways through staple holes, lap joints and any tear in the paper.
Now stack three storeys of windows and do the math again. This is exactly why building envelope consultants rank cladding by water-entry risk and put stucco and manufactured stone right at the top of that list.
If you’re weighing exterior finishes for a Calgary property, it’s worth understanding the difference between stucco and parging first. The two behave very differently once water is involved.
Does Calgary’s building code require a rainscreen behind stucco?
No. Calgary’s climate doesn’t trip the code trigger that forces a drained and vented cavity. The National Building Code sets that requirement using a moisture index threshold, and every municipality in Alberta sits well below it. Even the warmest spot in the province still logs about 4,650 heating degree days.
That’s the honest answer, and it’s probably the most useful thing on this page.
A rainscreen behind stucco in Calgary is a performance upgrade, not a legal minimum. Any contractor can meet code on your stucco wall without ever installing a cavity, and plenty do. The reason to install one anyway has nothing to do with inspectors and everything to do with what your wall looks like in year twelve.
The Beltline project here was designed by RJC and issued for tender in April 2025 under the National Building Code 2023 Alberta Edition, which is based on the National Building Code of Canada 2020. The engineer specified a rainscreen on a wall that didn’t require one.
That decision is the whole story.
What did the wall look like before?
The original wall was stucco on wire lath, over a single layer of building paper, over 9.5mm plywood sheathing. No cavity. No drainage space. That one layer of paper was doing four jobs at once with no way to shed what it caught.
Once the scaffold went up and the old cladding came off, you could see what that had cost.
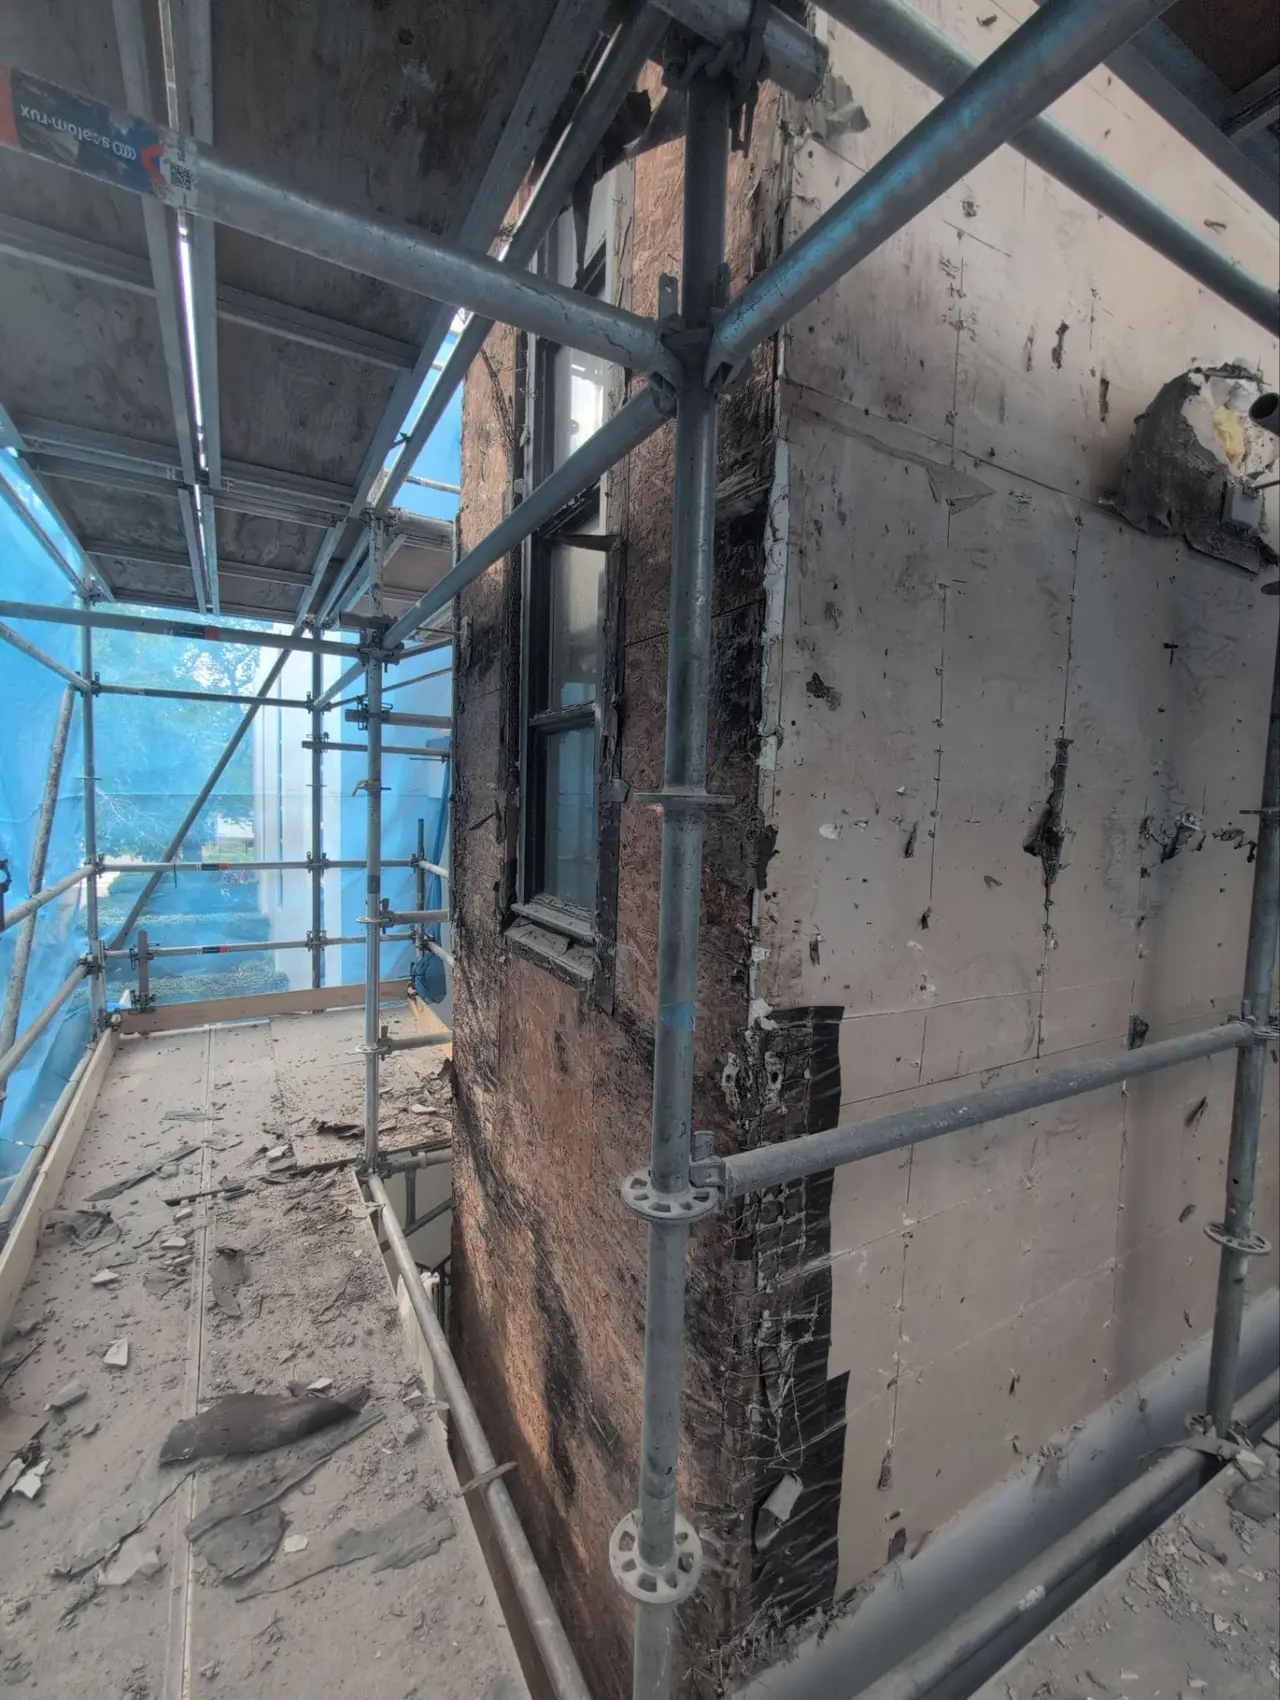
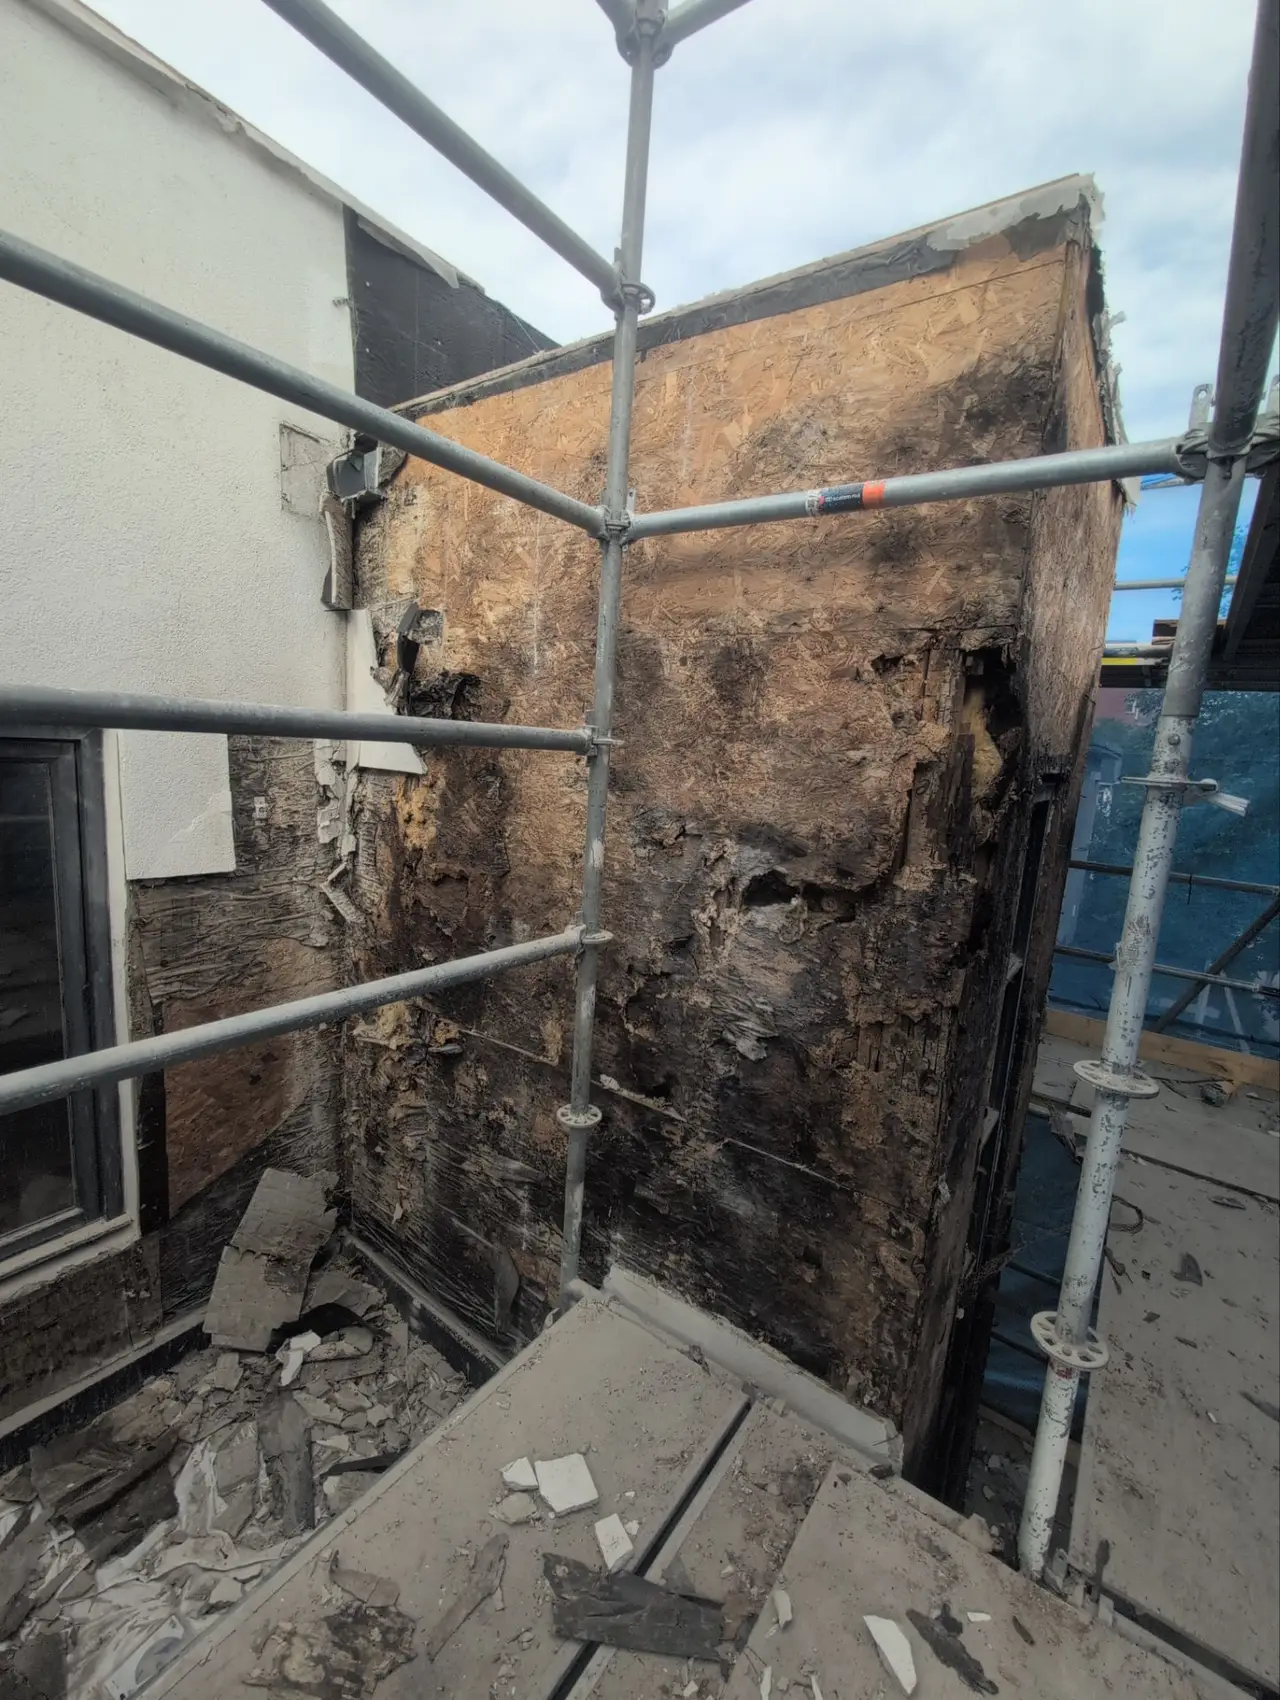
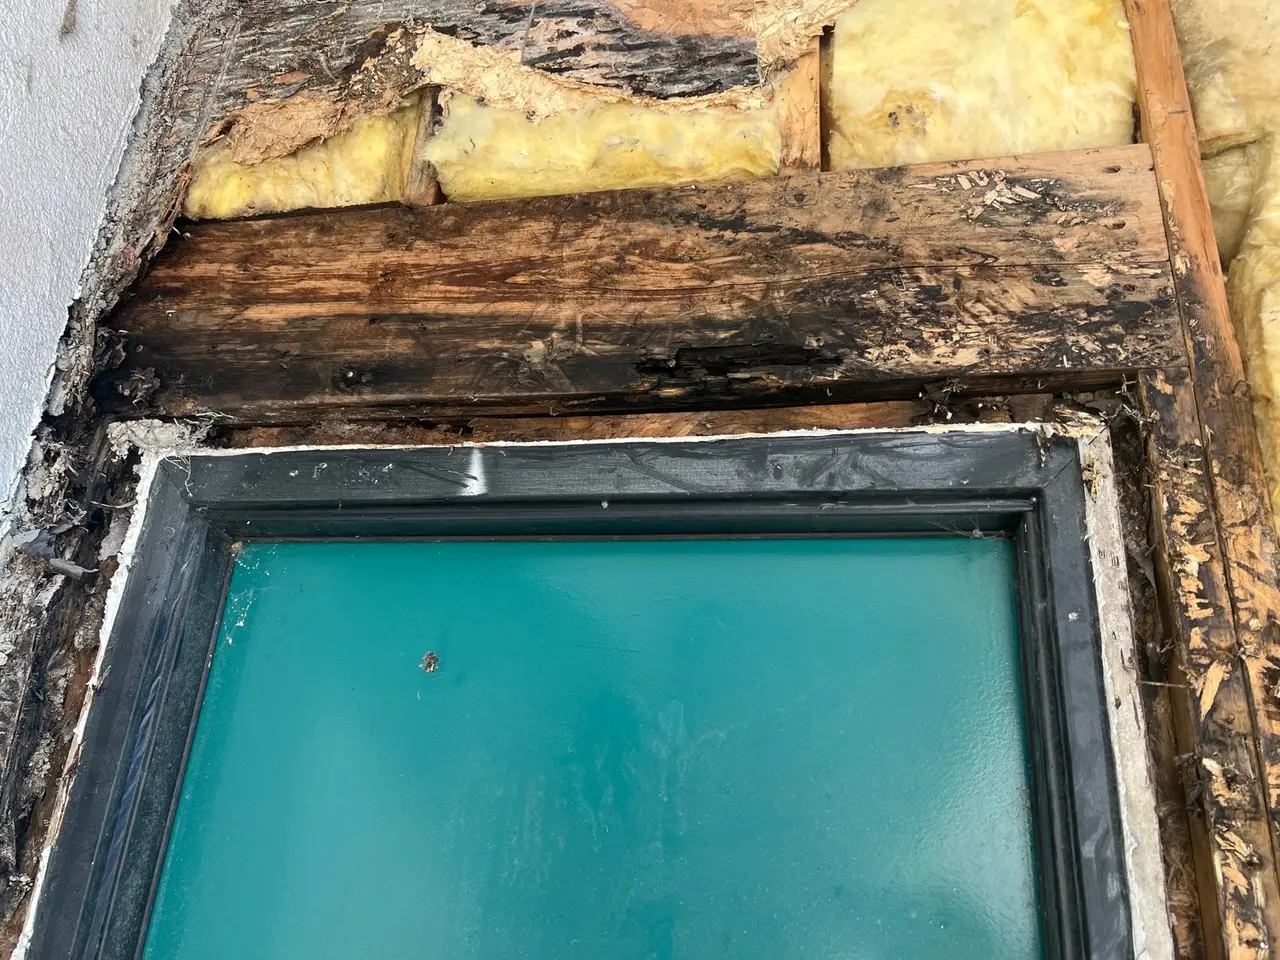
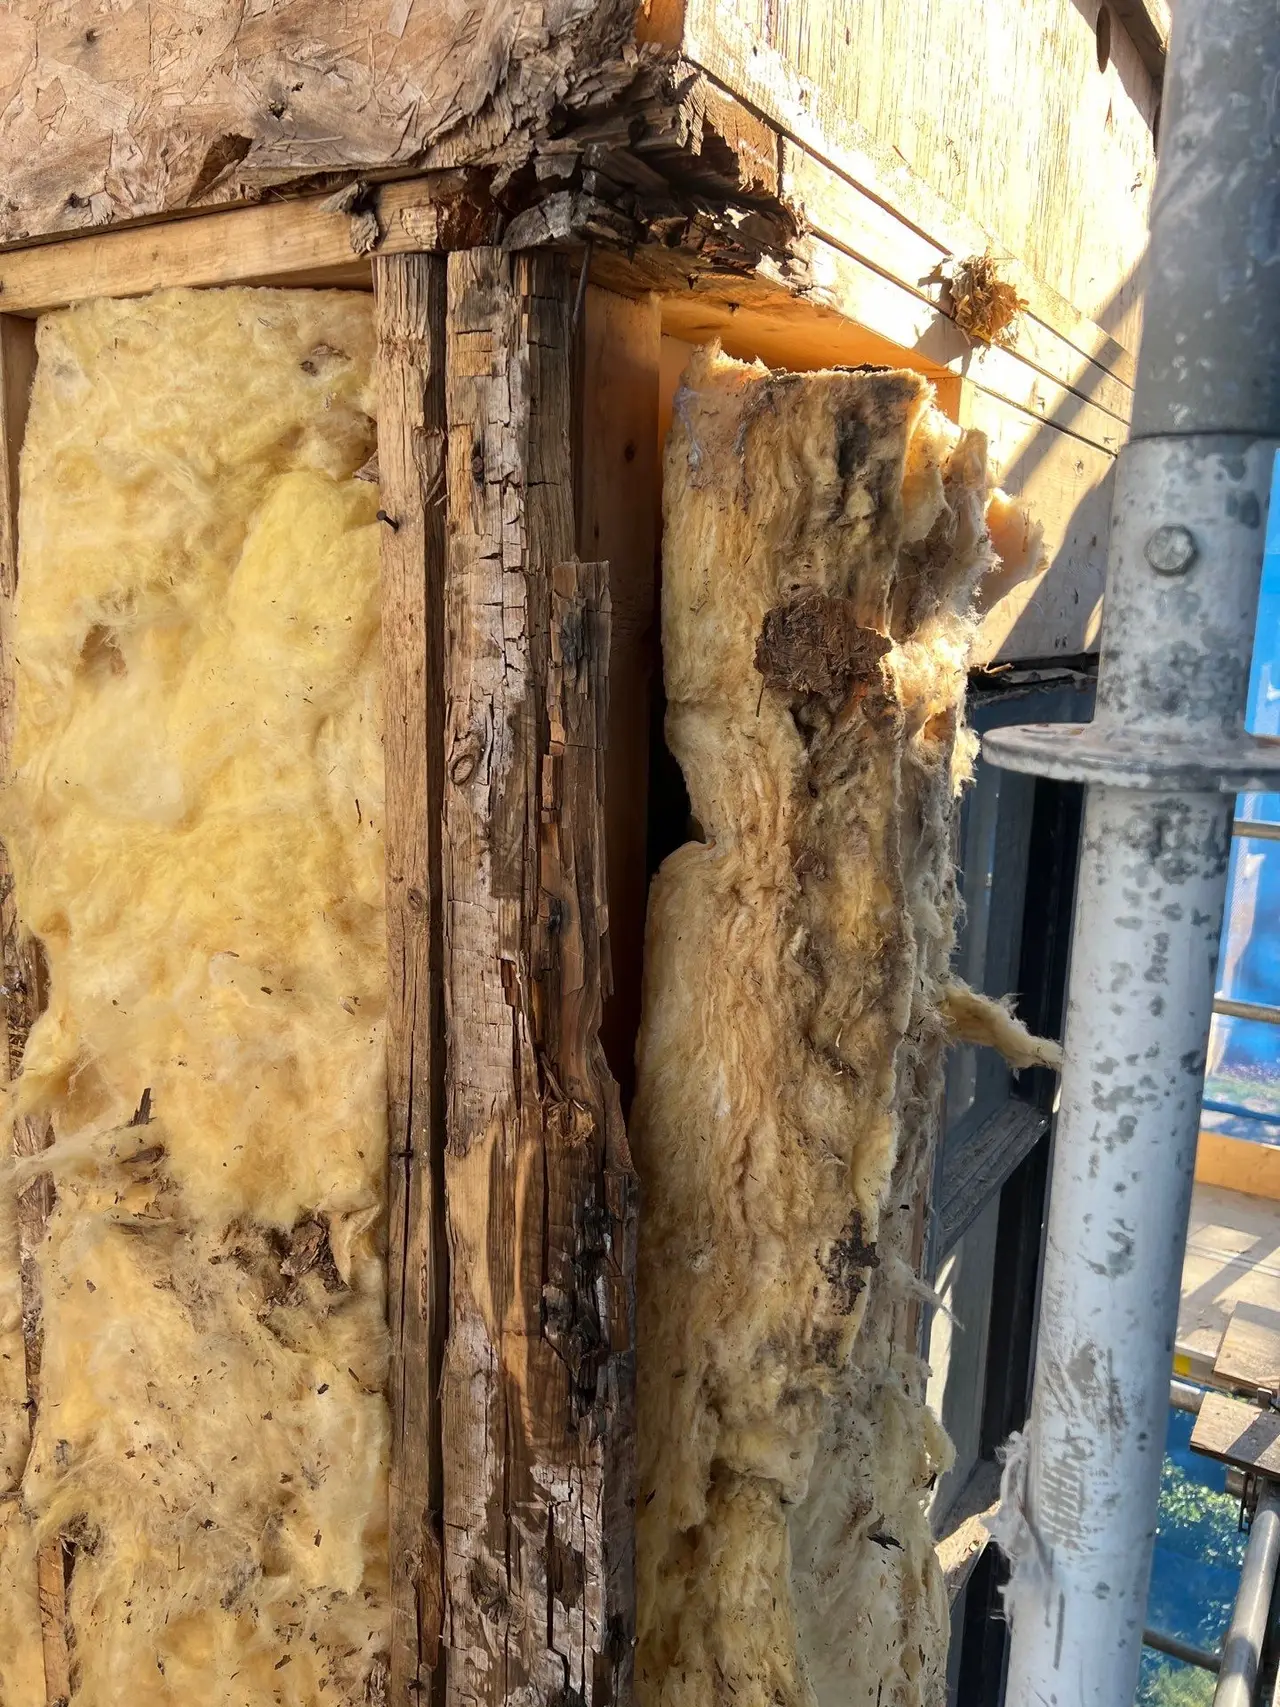
None of this is unusual for a face-bonded stucco wall of this age. Water didn’t pour in through one dramatic failure. It came in a little at a time, at windows, at penetrations, at joints, and it never left. You can see more of our finished and in-progress work in our completed projects.
What does a rainscreen stucco assembly look like?
Reading outside in: acrylic finish coat, Portland cement brown coat, Portland cement scratch coat, wire lath on a 3.1mm asphaltic cover board, 19mm pressure treated strapping, two layers of building paper, then the sheathing. The bolded layers below are the four that didn’t exist on the old wall.
| Layer | Old wall | New wall |
|---|---|---|
| Finish | Stucco on wire lath | 19mm stucco on wire lath |
| Lath substrate | none | 3.1mm asphaltic cover board |
| Cavity | none | 19mm pressure treated strapping |
| Weather barrier | one layer building paper | two layers building paper |
| Sheathing | 9.5mm plywood | 9.5mm plywood, kept where sound |
| Framing, insulation, vapour barrier, drywall | unchanged | unchanged |
Everything inboard of the sheathing stayed exactly where it was. Nobody moved a stud or touched the drywall. This is a cladding retrofit, not a gut, and the envelope got rebuilt from the sheathing outward.
Why two layers of building paper instead of one?
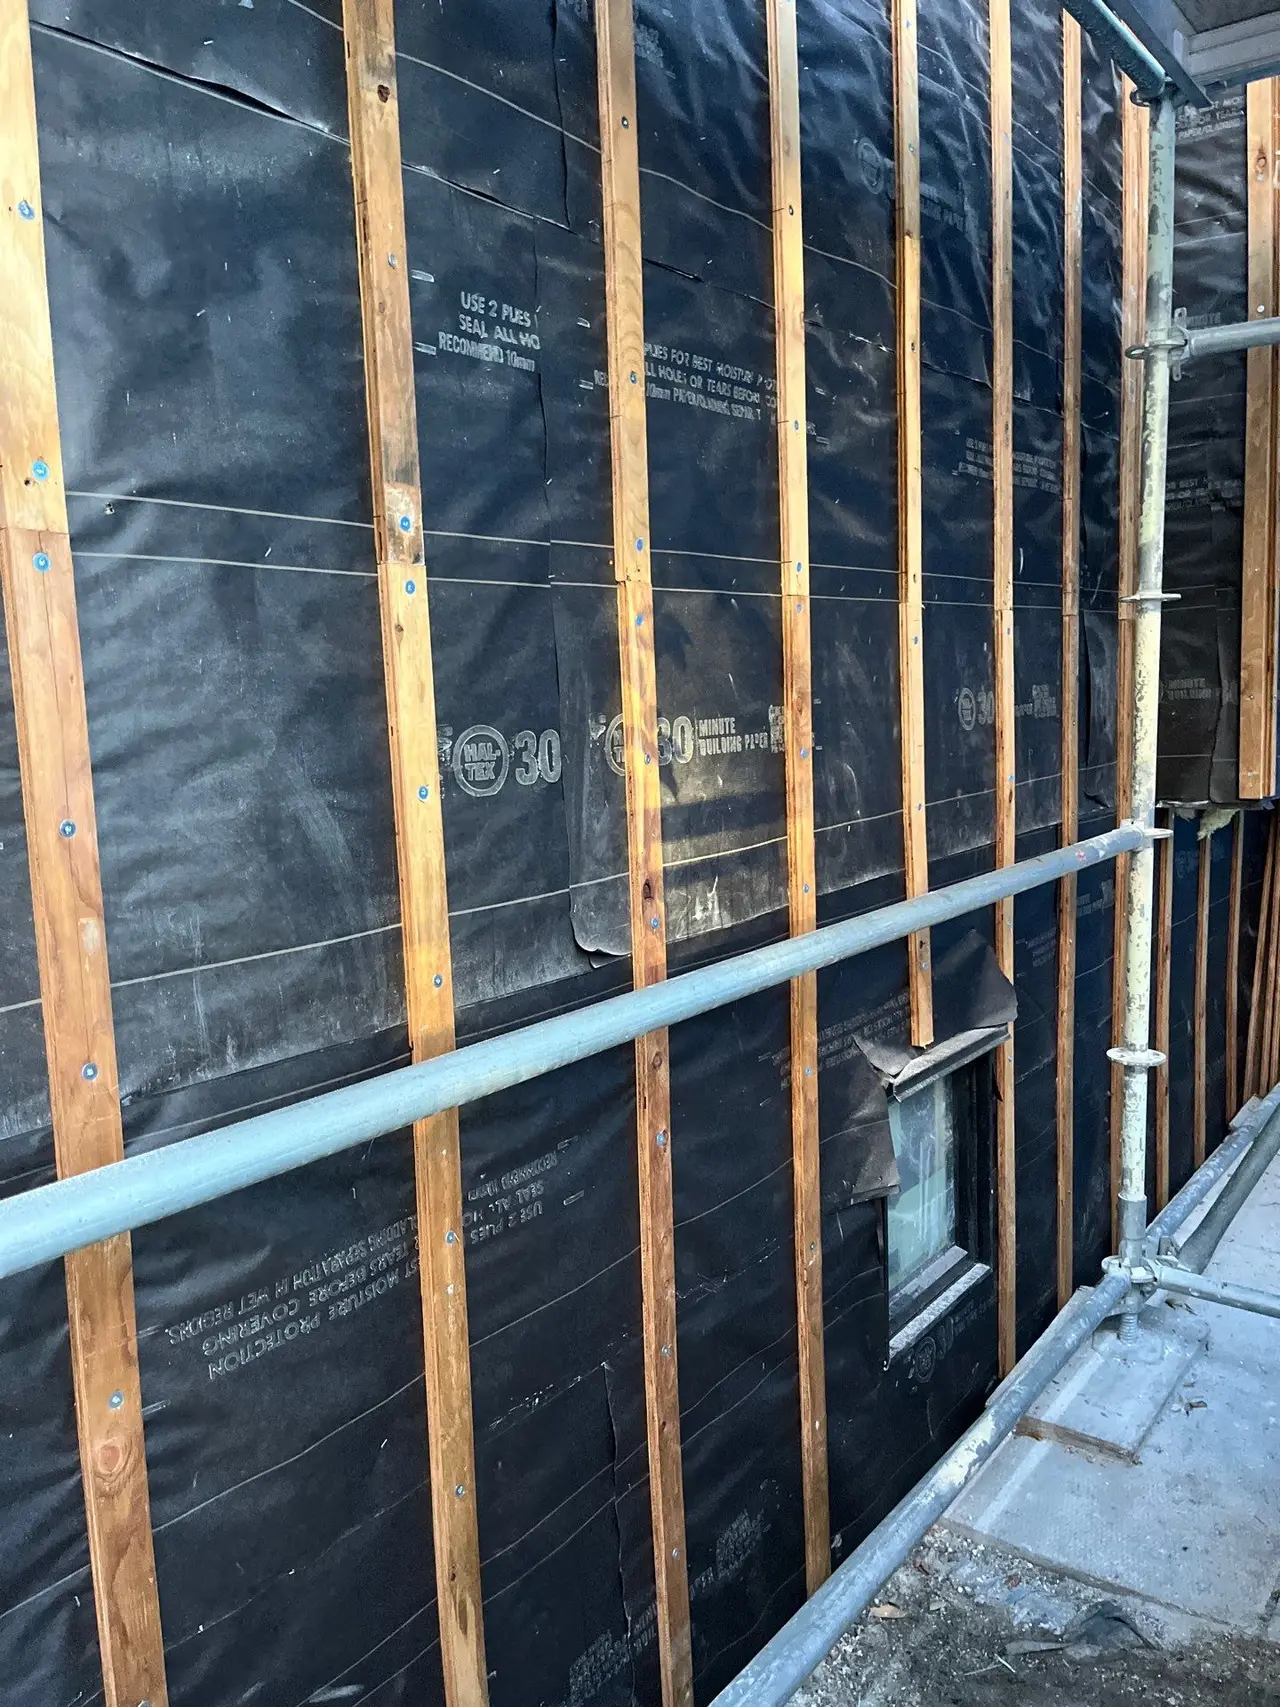
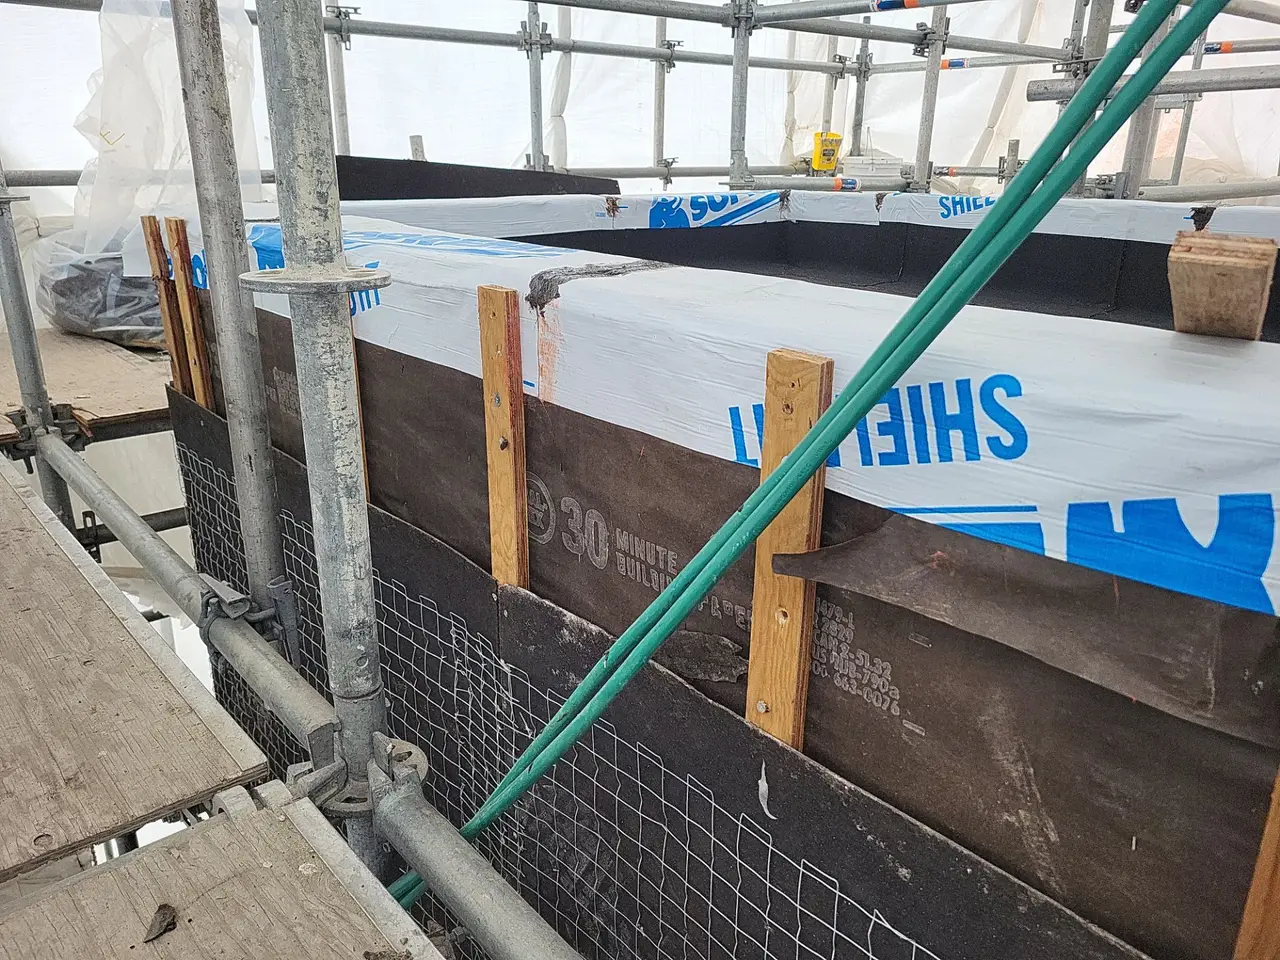
Because two layers split one job into two. The inner layer handles bulk water as the drainage plane. The outer layer takes the wind pressure and the physical beating of strapping and lath being fastened through it.
The manufacturer agrees, and prints it right on the product. The roll used on this project says “use 2 plies for best moisture protection” directly on the paper, along with “seal all holes or tears before covering” and a recommended 10mm separation between paper and cladding.
That’s a materials manufacturer putting the rainscreen principle on the roll itself.
Why is the strapping pressure treated?
Because it lives in the wet zone. It sits outboard of the weather barrier, inside a cavity designed to get wet and then dry out. Untreated furring in that spot becomes a service-life problem long before your stucco does.
This is one of the fastest ways to judge a rainscreen installation. Bare spruce strapping in a drained cavity means somebody bought the concept and skipped the consequence.
What does the asphaltic cover board do?
It gives the lath a continuous, solid backing across an open cavity. Without it, the lath spans between straps and the stucco has nothing to key into in the gaps.
The board is thin, 3.1mm, about an eighth of an inch. It isn’t insulation and it isn’t a weather barrier. It’s simply the surface that makes it possible to hang three coats of cement stucco on a hollow wall without the whole thing flexing.
How is a rainscreen stucco wall built, step by step?
Nine stages, in strict order. Each one has to be finished and inspected before the next one buries it.
- Strip the wall and see what you’ve actually got. Old cladding, lath and paper come off. Deteriorated sheathing, framing and insulation get found and priced before anything new goes on.
- Replace whatever sheathing is compromised. New 9.5mm plywood goes back where the old panel was gone. On the fire-rated party-wall side of this building, that meant exterior Type X gypsum sheathing instead.
- Install two layers of building paper, shingle-lapped upper over lower. Laps run a minimum of 4 inches (100mm). The industry recommendation bumps that to 6 inches, or 8 to 10 inches on a high-exposure wall.
- Detail every penetration into the paper before anything covers it. Windows, vents, pipes, light fixtures and electrical all get their membrane and flashing worked into the paper in sequence.
- Fasten the strapping over the paper, on a continuous bead of mastic.
- Install the asphaltic cover board and the wire lath.
- Set the stucco stops, casing beads, corner beads and control joints.
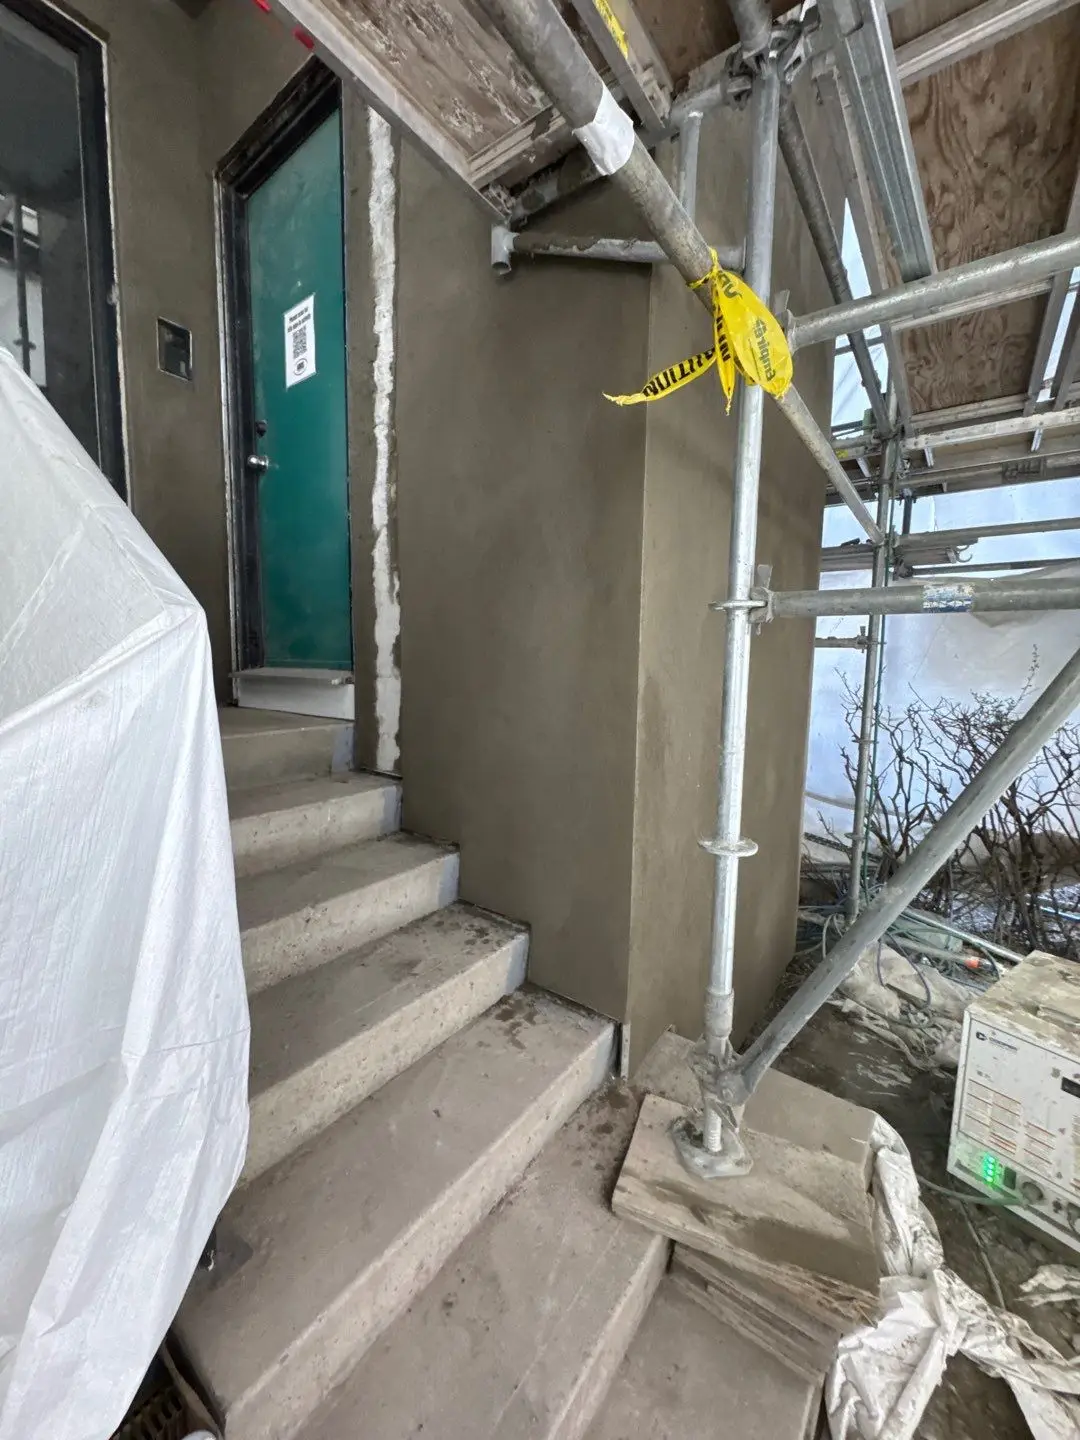
- Apply the scratch coat and the brown coat, both Portland cement.
- Apply the acrylic finish coat.
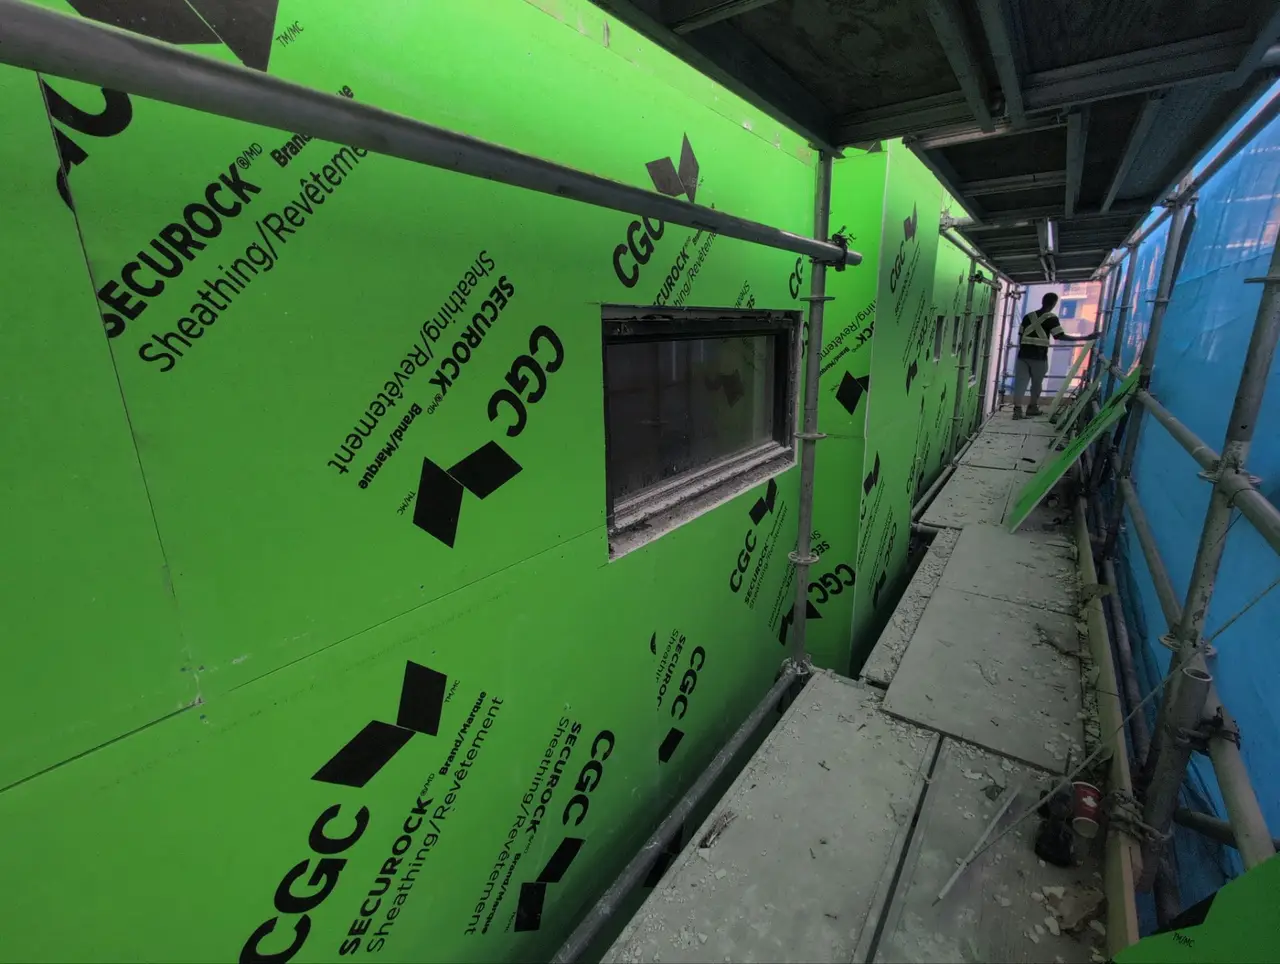
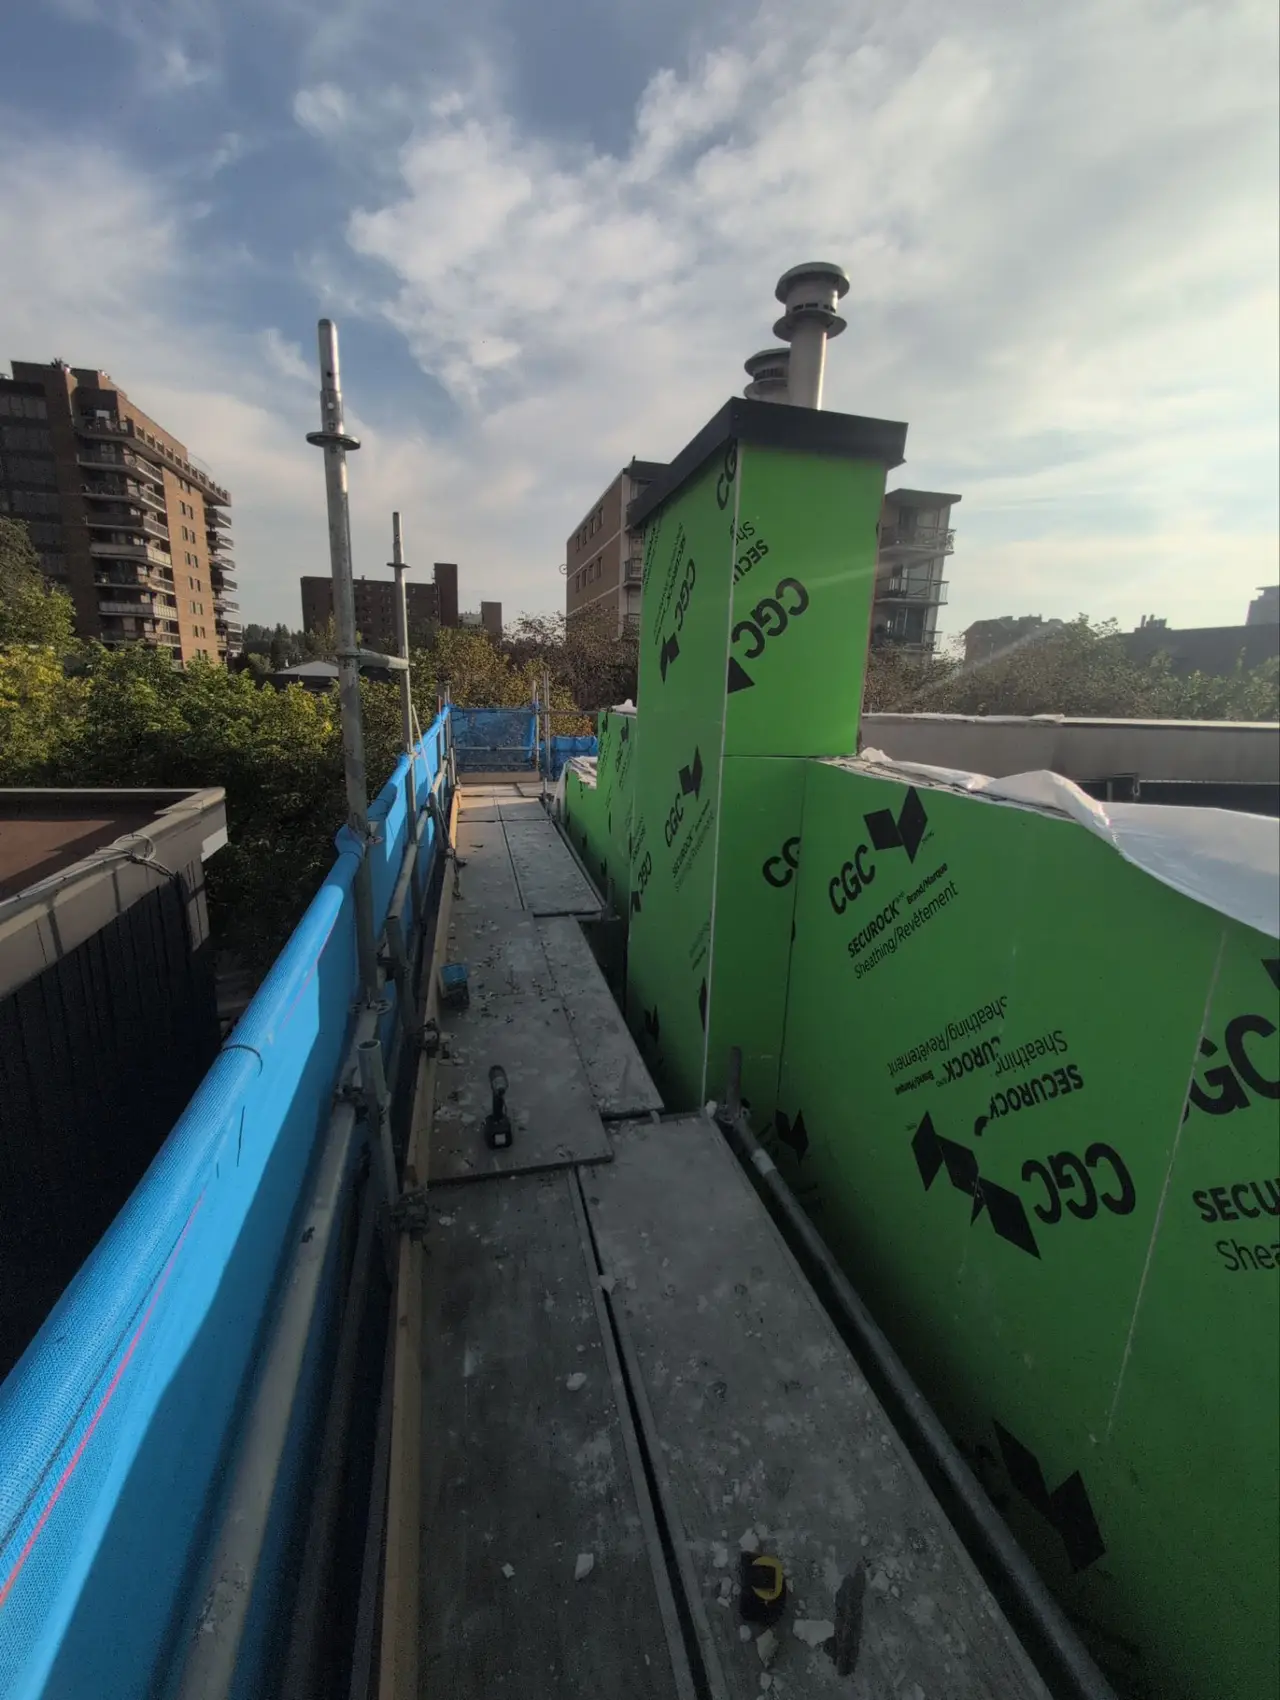
Why is there mastic behind every strap?
Because every single strap gets nailed through the drainage plane. Each nail is a hole in the one layer whose entire job is keeping water out of your wall.
So the specification calls for a continuous bead of mastic on the face of the building paper behind each strap, with the nails driven through the mastic. The fastener seals itself as it goes in. Straps get 8d nails, 65mm long, at a maximum of 300mm on centre, which across a full elevation adds up to hundreds of penetrations through the weather barrier. Every one of them sealed at the moment it’s made.
Here’s the thing about that detail: it disappears the second the cover board goes on. Nobody will ever see it again.
It’s also the clearest possible signal of whether a rainscreen was built properly or just built.
Why do we seal some gaps and leave others open?
Sealant goes where water would get in. Openings stay where water needs to get out. A rainscreen only works if the water it collects has somewhere to go.
The pattern holds across every detail on this project:
| Location | Sealed | Left open on purpose |
|---|---|---|
| Wall vent | sides and below | top |
| Light fixture | top and sides | bottom |
| Horizontal pipe | below and sides | top |
| Window sill flange | never sealed behind the flange | 12mm weep holes at 200mm on centre |
| Head flashing to stucco | not sealed | 10mm gap |
Look at a window head on a finished rainscreen wall and you’ll spot a deliberate 10mm gap between the flashing and the stucco above it. Most homeowners read that as sloppy work. It’s the opposite. Seal that gap and you’ve just trapped everything the flashing collected inside your wall.
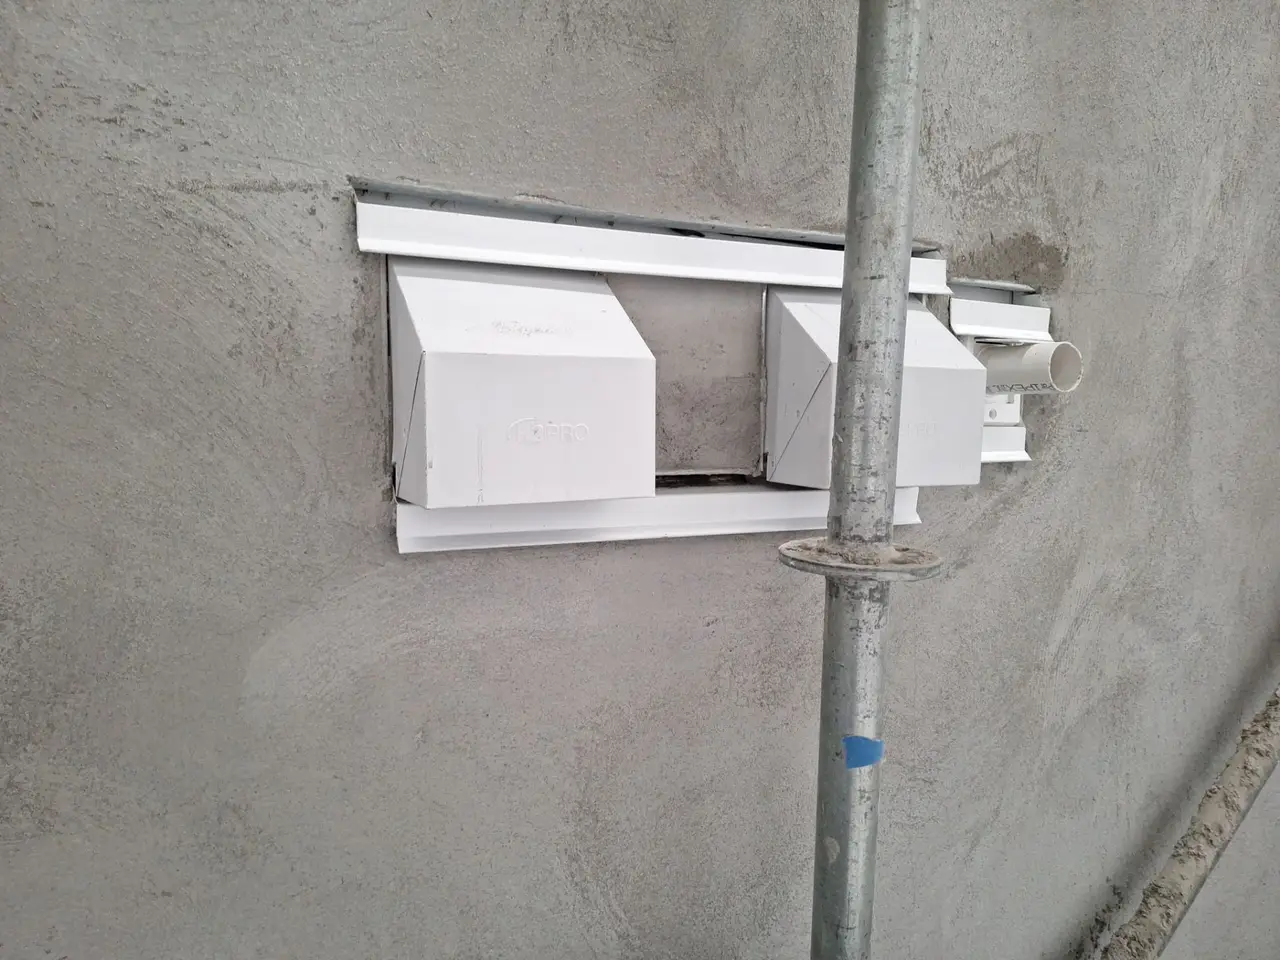
The same logic runs through the flashing itself. Head flashings get end dams, and those end dams are folded out of the sheet rather than cut and caulked, because a folded corner has no joint to fail.
What happens at windows, vents and pipes?
Every opening gets membrane, flashing and paper worked into the wall in a fixed order, before the strapping goes on. Get that order wrong and no amount of caulking later will save it.
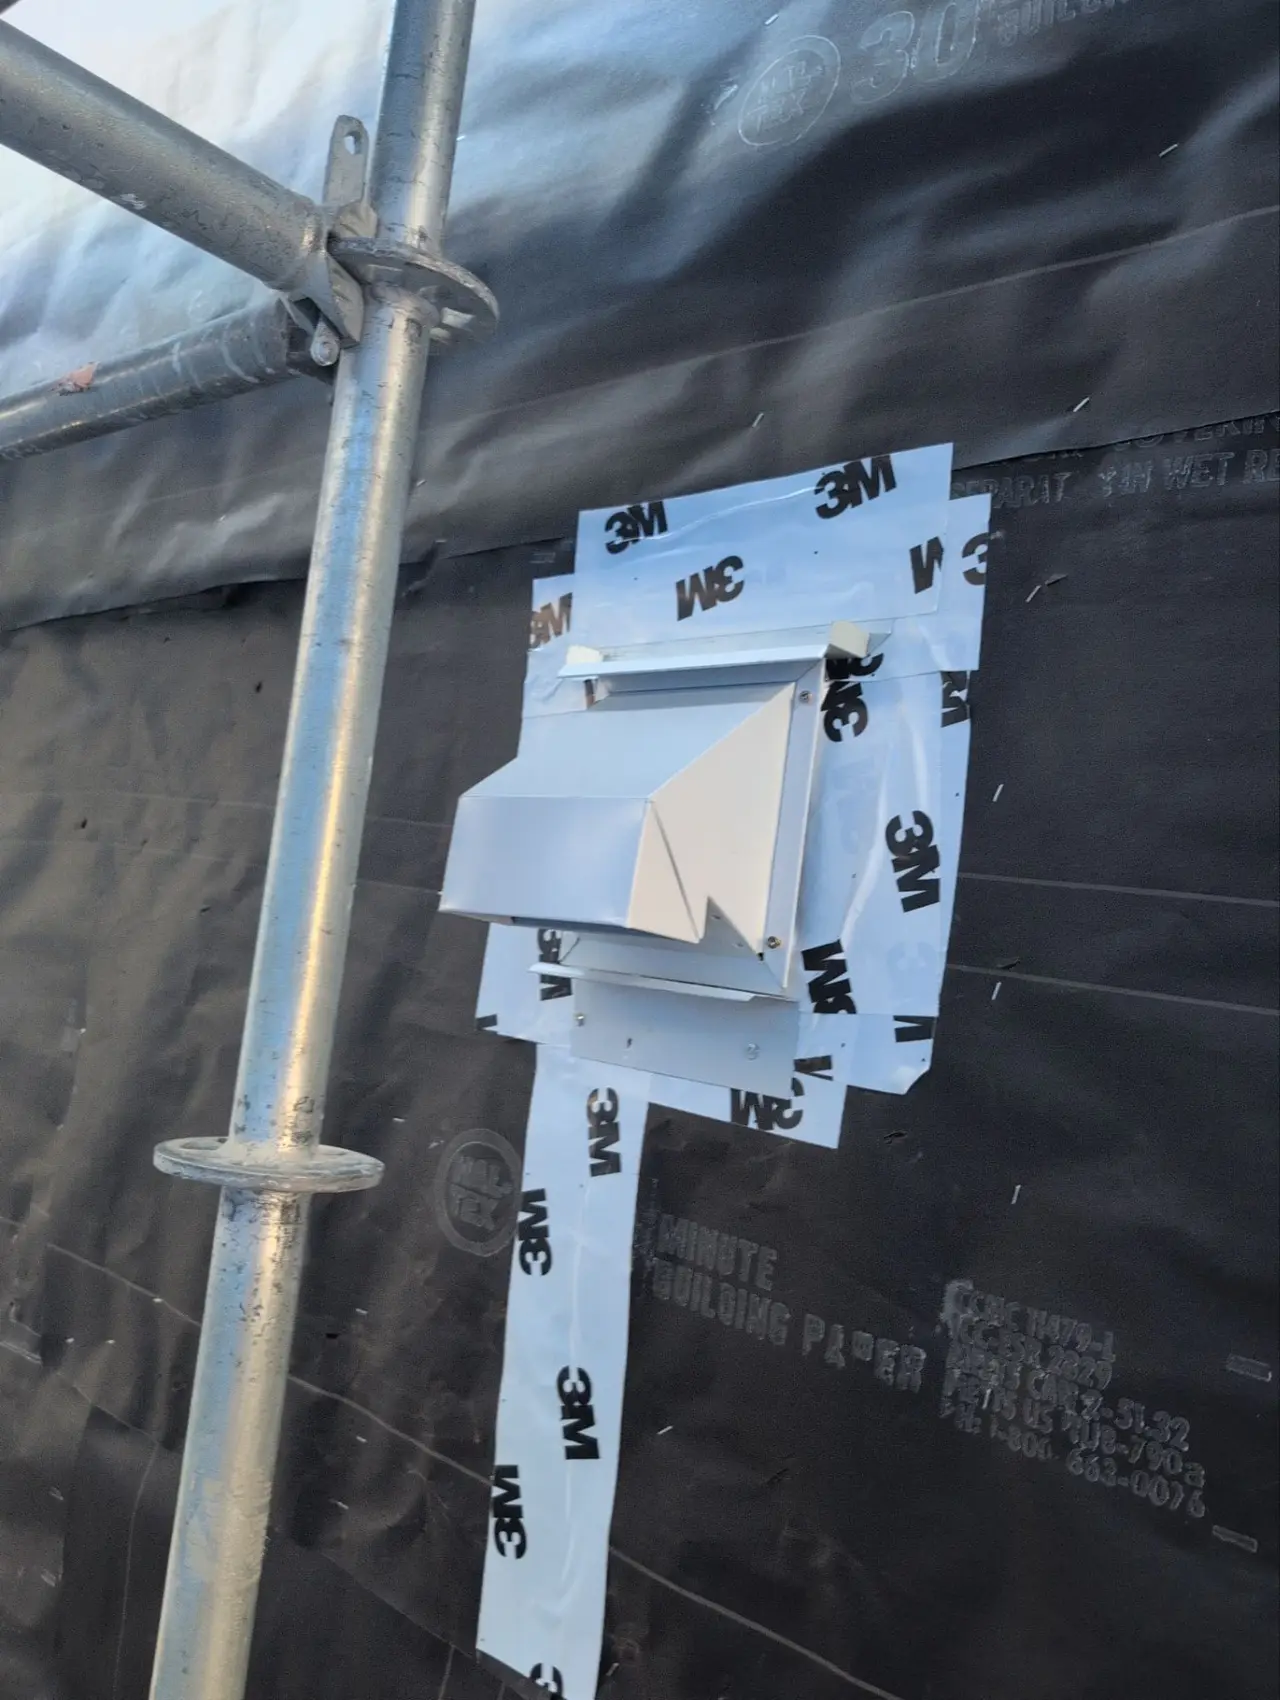
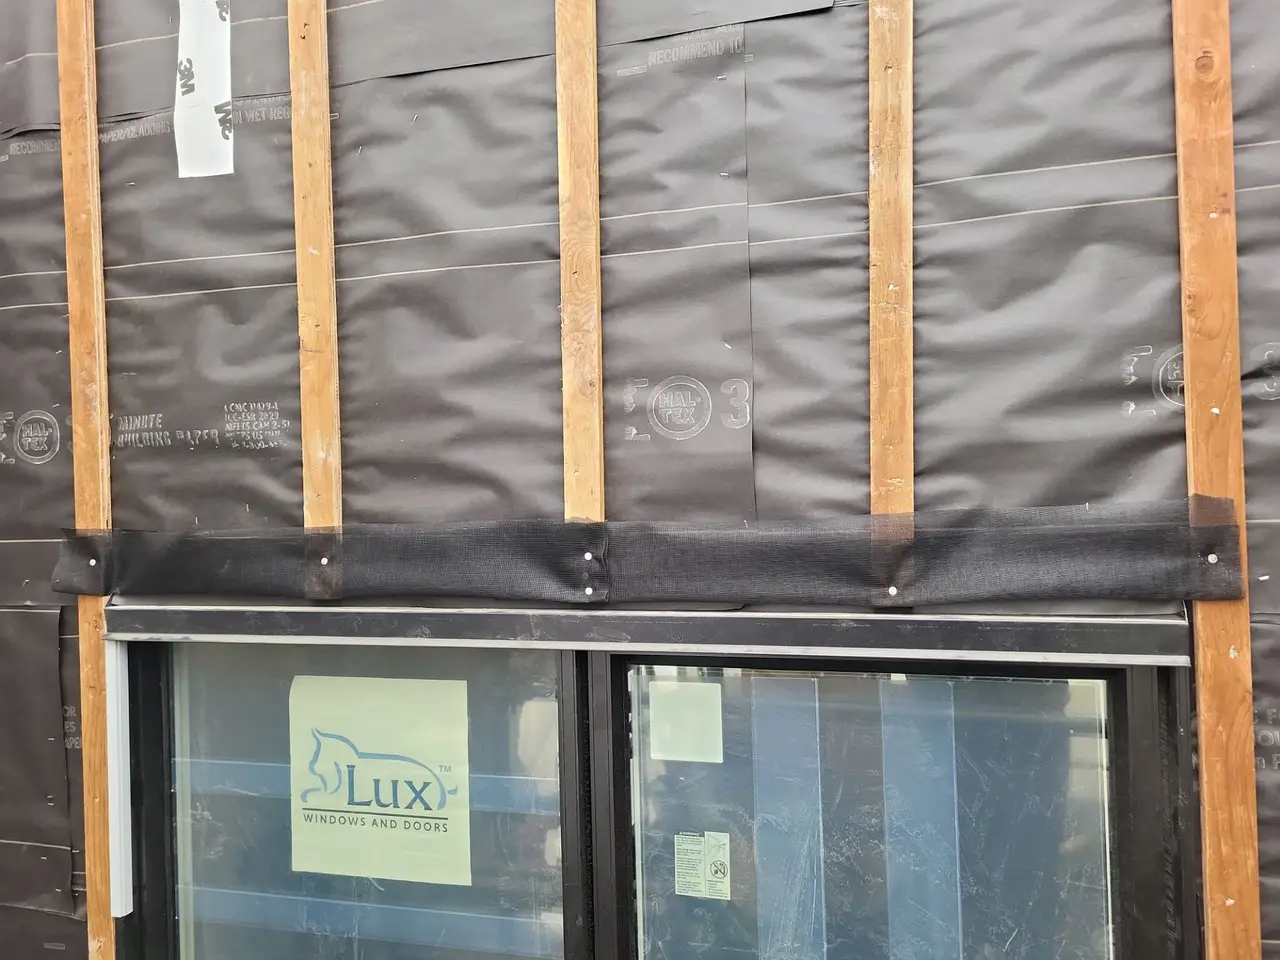
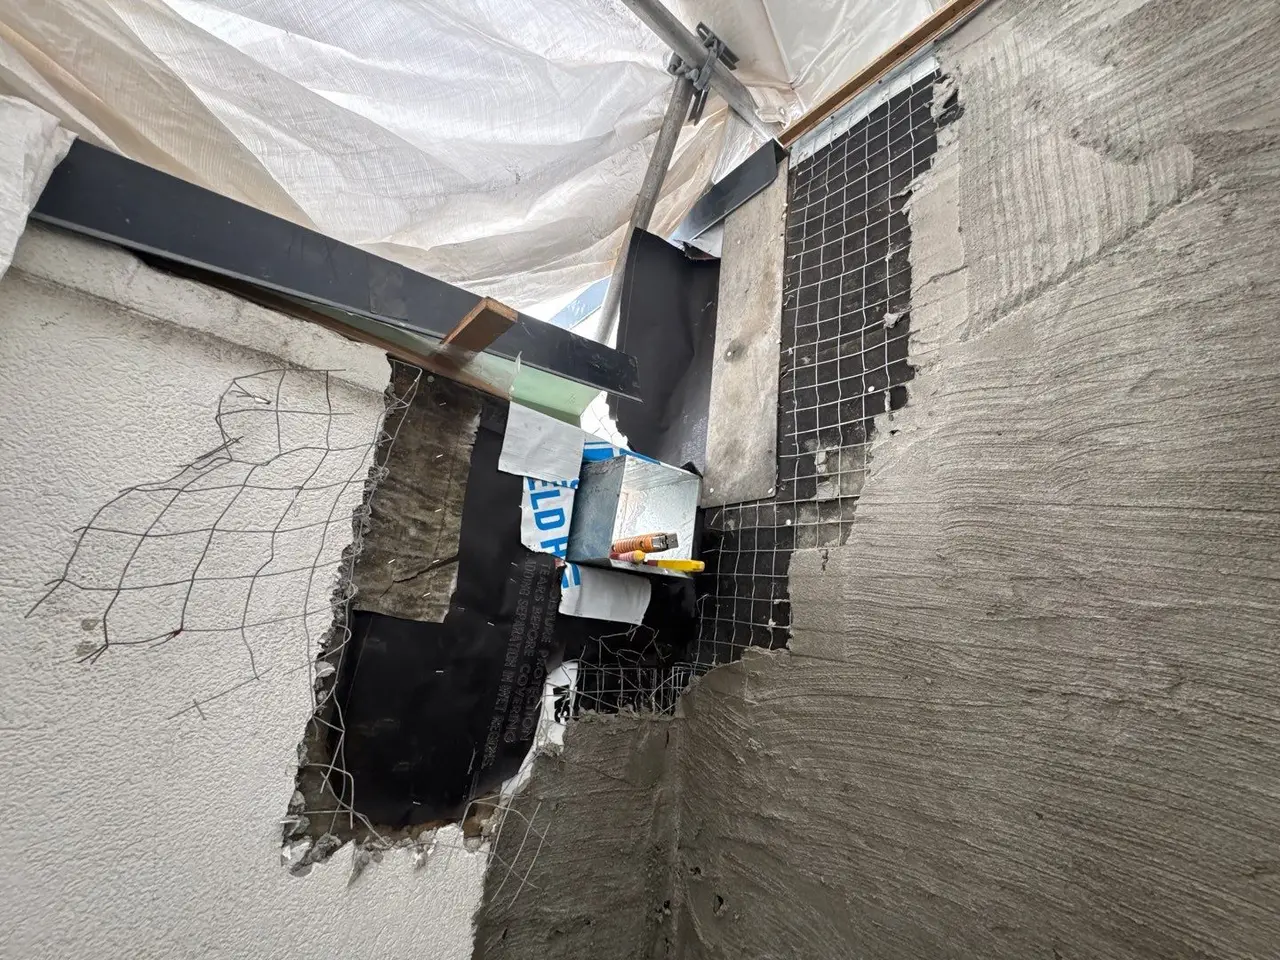
For a wall vent, the sequence runs like this: starter patches of paper on the sheathing, then the vent set with its flange sized to suit the strapping depth, then field layers of paper tucked under the starter patches, then self-adhered membrane and a head flashing with end dams extending past the vent, then two more field layers shingle-lapped over the flashing, then the strapping. Sealant goes on dead last, at the sides and underneath only.
Two small things on the vent itself are worth noticing. The metal drip edge inside sits clear of the exterior finish, and the grille comes off. Minor details, but they’re what decides whether that vent still works in year ten.
Penetrations are also where most after-the-fact damage turns up. Anything that puts a fresh hole in a finished stucco wall breaks the same drainage plane this whole sequence was built to protect, and that includes satellite mounts, deck ledgers and woodpecker damage.
How does the cavity drain and vent?
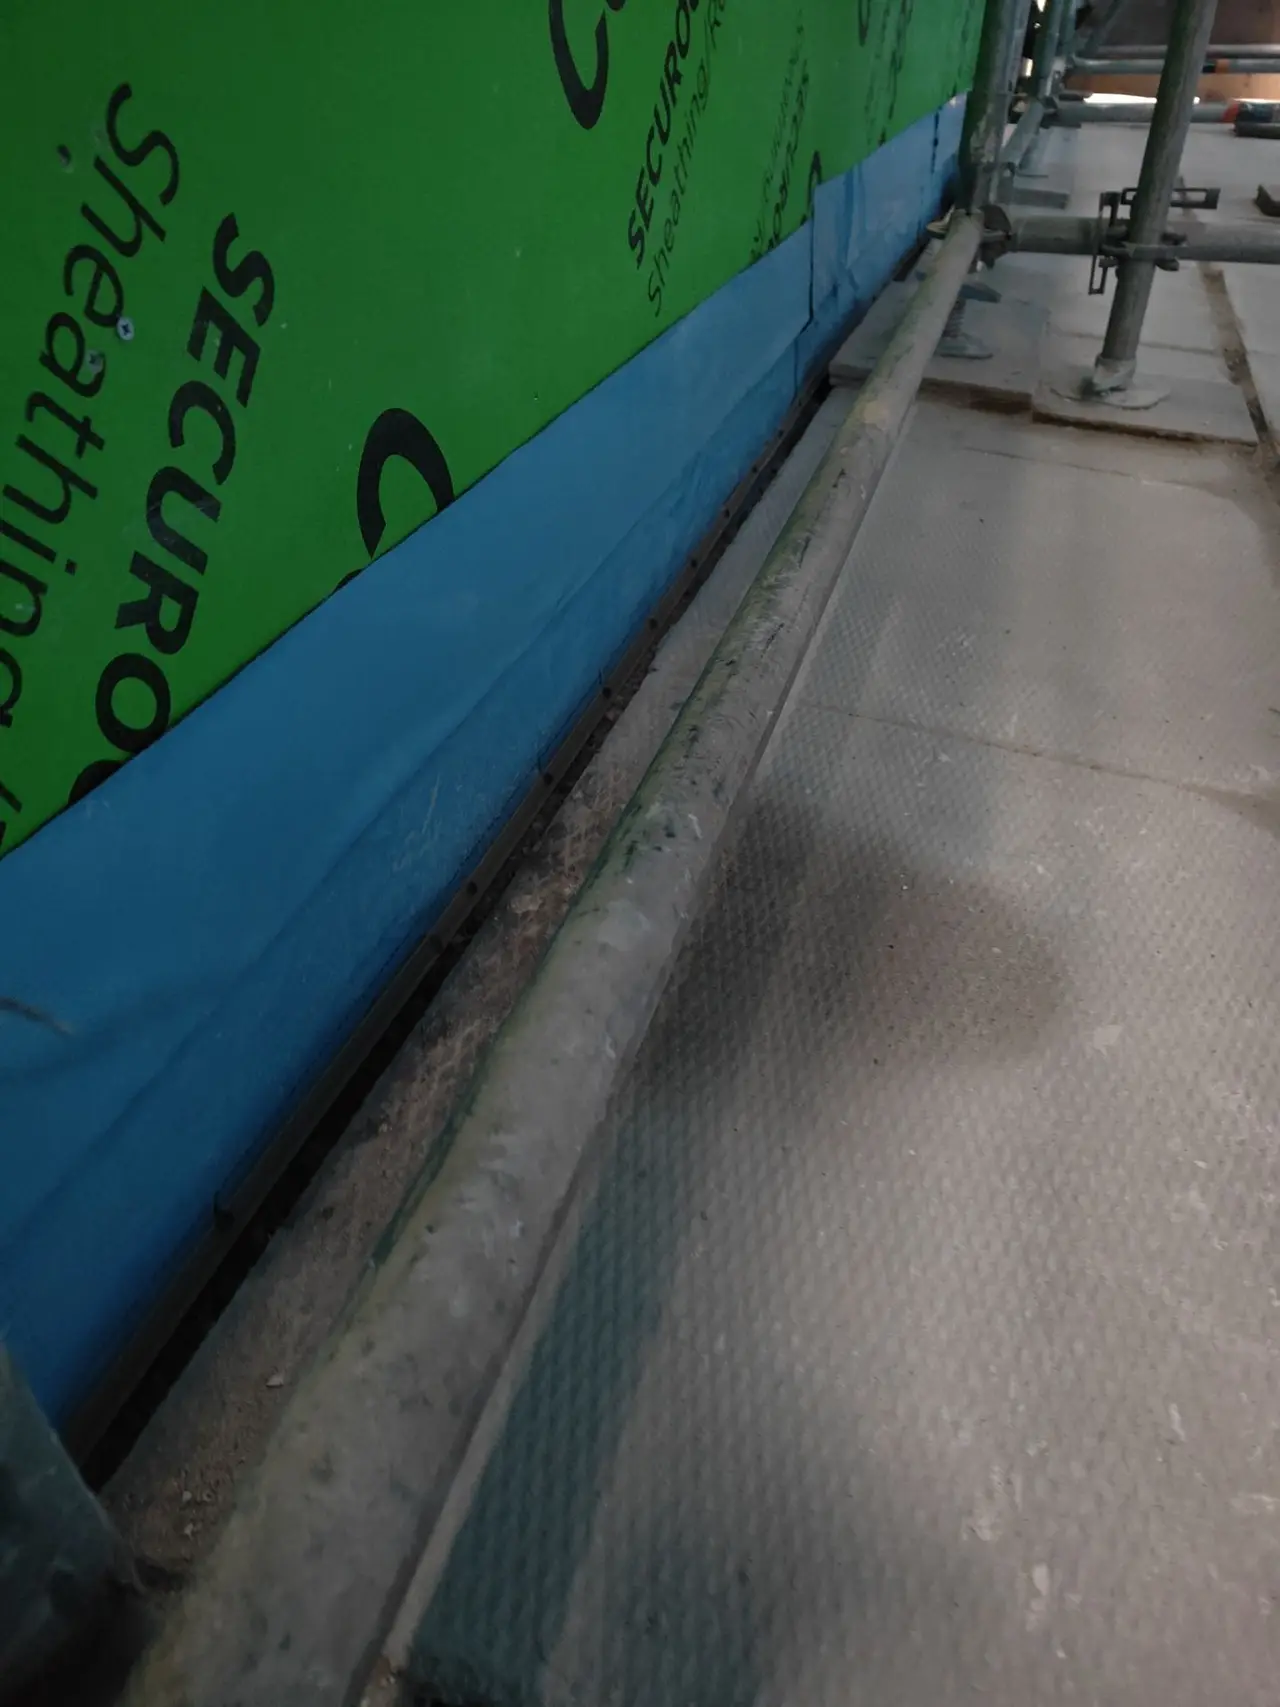
Through a stucco weep screed with drain holes at the bottom, plus open, screened gaps at every other stucco termination. Water in the cavity runs down the back of the stucco, hits the weep screed and leaves. Air comes in through the same openings and travels up.
This is the part almost nobody thinks about. A cavity that can’t breathe is just a void. The specification on this project calls for a weep screed with drain holes and insect screen at all stucco terminations, which keeps the cavity open to air while keeping wasps and mice out of it.
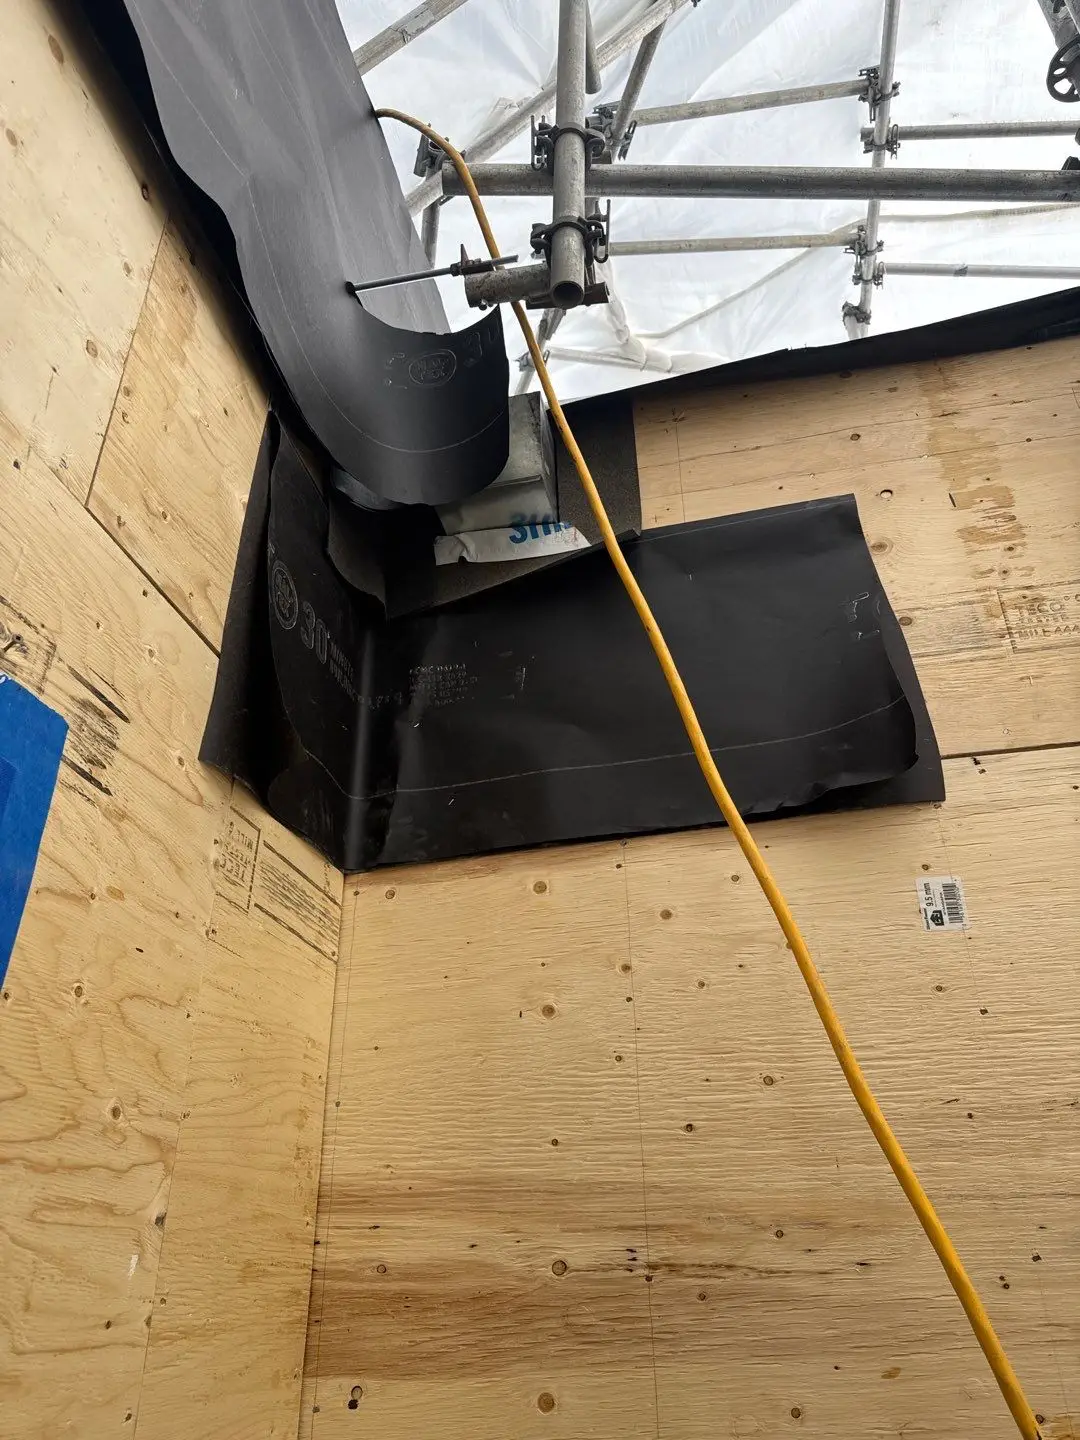
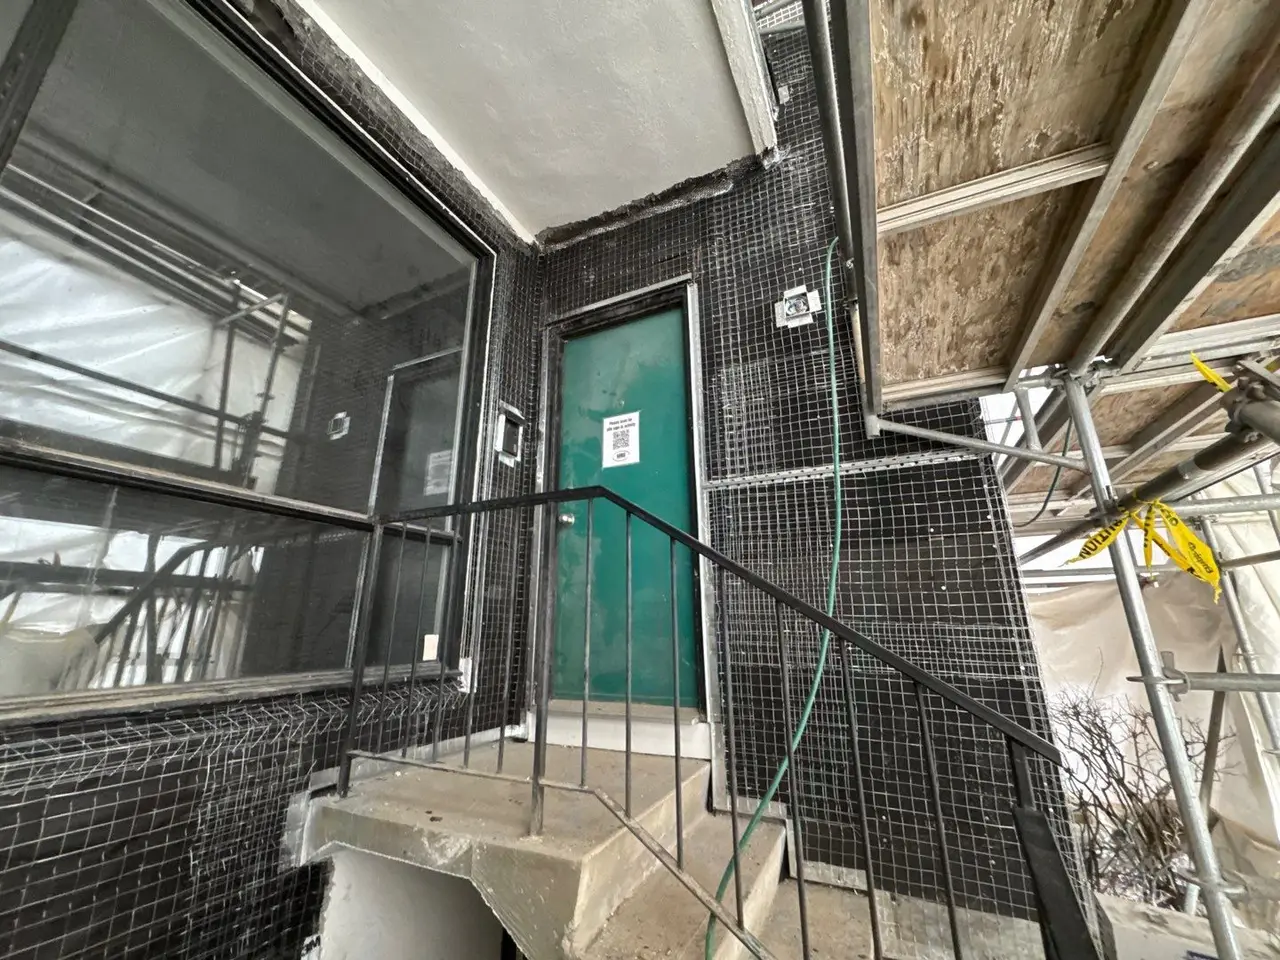
The photo below is the clearest look at what that actually means. It shows the underside of a projecting chase, where the wall assembly stops and the cavity is deliberately left open.
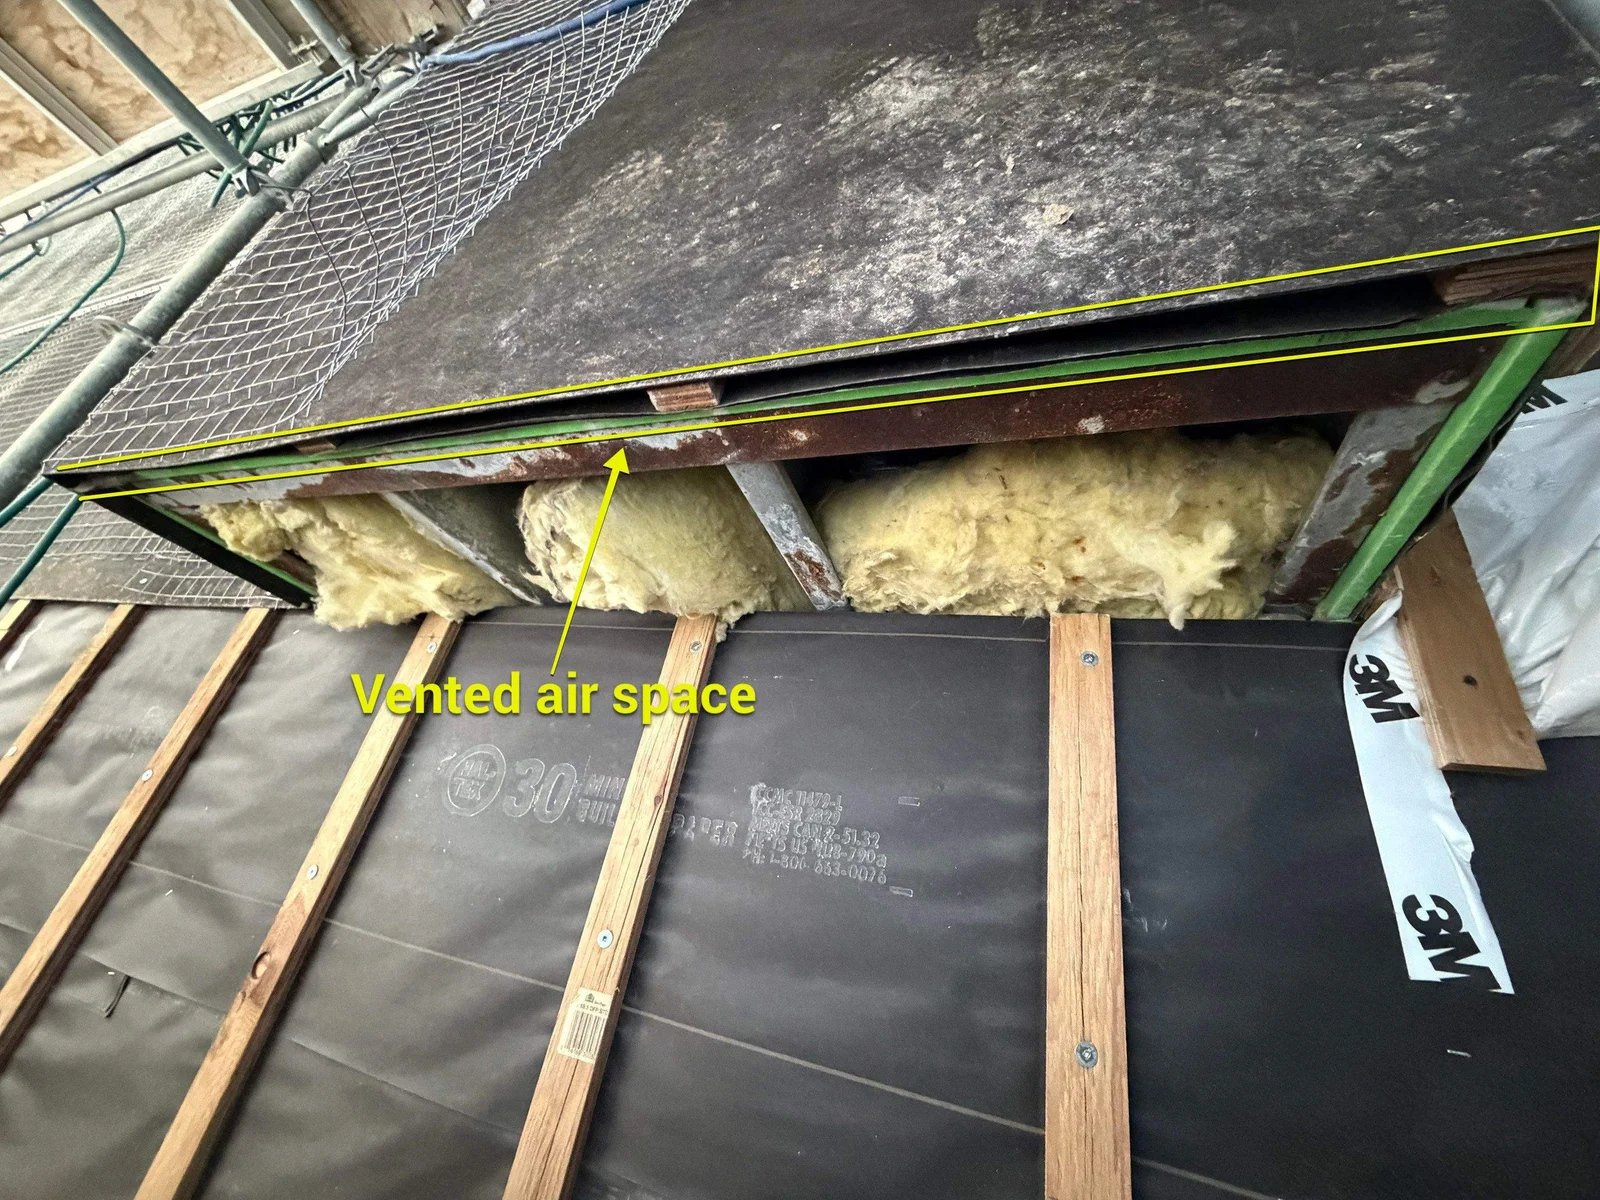
Two things in that photo are worth calling out. First, the gap runs continuously. It isn’t a row of holes. Second, the strapping runs vertically, and that’s no accident. Vertical strapping gives water an uninterrupted path down and air an uninterrupted path up. Furring run horizontally traps water on the top edge of every strap and creates the exact pressure the cavity was built to prevent.
The base of the wall has its own job too. It has to hold clearance above whatever surface it lands on, and the paper has to lap correctly onto the self-adhered membrane at the foundation. Where a wall meets grade or a concrete topping, that junction is doing as much envelope work as the wall above it, which is why foundation repair and cladding work land on the same scope so often.
What goes wrong when demolition is rushed?
Cut too deep at a control joint and you destroy the paper and lath tie-in, which breaks the second plane of protection at exactly the point where two walls meet. You won’t know until it leaks.
On this project the demolition scope spelled it out. Roughly 6 inches of old stucco was left standing at the control joint, and it had to come off while keeping the paper and mesh tie-in intact.
The engineered detail explains why. Saw cut depth is controlled so the existing building paper and lath survive. Then the new lath laps the old by a minimum of 100mm, and the new building paper laps the old by 300mm. That existing paper gets treated as a material to salvage, not garbage to sweep up.
A year into the job, that same principle came back as a live cost decision. The reviewer flagged that a minimum 4 inch paper overlap had to be achieved on the correct side of a control joint above a scupper. If it couldn’t be, more stucco would have to come off, into the neighbouring unit, to get it.
That’s what a real quality standard looks like. The lap isn’t negotiable. If demolition wrecked it, you go back and open more wall.
The same project also required the engineer to re-inspect before the scratch coat went on, and for good reason. Once cement covers the paper, the lath and the flashings, none of it can be seen again.
Everything that matters on a stucco wall gets buried by the first coat.
How can you tell if your Calgary stucco has a rainscreen?
Look at the bottom of the wall and at the flashings. Three checks, about a minute each, no tools needed.
- Check the base of the wall for a weep screed. A rainscreen ends in a screed with drain holes and a screened opening. A face-bonded wall usually runs the stucco straight down into a trim or the concrete with nothing that drains.
- Check above your window heads and vents for a deliberate gap. A visible slot between flashing and stucco is correct. Caulk filling that gap is a warning sign.
- Check for insect screen at terminations. Screen means somebody expected the cavity to be open to air. No screen usually means there’s no cavity to protect.
If you find caulking where drainage openings should be, get eyes on it. Sealing a drainage path is one of the most common ways a well-meant repair quietly makes a wall worse. Our stucco repair in Calgary page covers what remediation involves.
What drives the cost of rainscreen stucco in Calgary?
Access, the condition of whatever is hiding behind your old cladding, and how many penetrations the wall has. The rainscreen layers themselves, strapping, one extra layer of paper and a cover board, are a modest slice of the total.
Scaffolding on a multi-storey wall often costs more than the stucco does. Deteriorated sheathing and framing can’t be priced honestly before demolition, which is why a responsible quote separates the cladding scope from a substrate allowance. And every window, vent, pipe, light and scupper is a hand-built assembly that adds hours.
Because nobody knows the substrate until the wall is open, treat any fixed price for a full re-clad with a bit of caution. Compare it against what stucco repair costs in Calgary, and for foundation-level work, parging cost. For a wider view of what Calgary property owners are choosing and paying right now, see stucco trends and pricing in Calgary.
How do you maintain a rainscreen stucco wall?
Keep the drainage openings open, and check your sealant joints once a year. The cavity does the hard work, but only if nothing blocks it.
Walk the base of the wall each spring. Confirm the weep screed is clear of soil, mulch and ice damage. Confirm the screen at terminations is still intact. Make sure nobody has caulked a head flashing gap shut. Check the sealant joints at windows and doors for splitting.
Your finish coat matters too. The acrylic on this project was specified to match the existing colour or a colour the owner picked, and acrylic behaves differently from a traditional cement finish once Calgary’s freeze-thaw cycling gets going. If you’re deciding between them, our comparison of conventional stucco and acrylic finishes breaks down where each one earns its keep. For ongoing care, see how to maintain stucco, and if a colour change is on your mind, stucco painting covers what coatings do to a breathable wall.
Frequently asked questions
Is a rainscreen required by code for stucco in Calgary?
No. Alberta’s moisture index sits below the threshold that forces a drained and vented cavity under the National Building Code, so a stucco wall in Calgary can meet code without one. Engineers specify rainscreens on Calgary buildings as a durability upgrade, not a compliance requirement.
How big does the air gap behind stucco need to be?
The code reference point for calling a wall drained and vented is 10mm, or 3/8 of an inch. The Beltline wall described here used 19mm strapping, roughly 3/4 of an inch, about double the minimum. Research on wall performance suggests that having the gap matters more than its exact size.
Can you add a rainscreen to existing stucco without removing it?
No. The cavity sits behind the stucco and in front of the weather barrier, so the existing stucco, lath and building paper all have to come off. A rainscreen is a re-clad, not an overlay.
Does a rainscreen make the wall warmer?
Not directly. The cavity is a drainage and drying space, not insulation. On this project the existing R-20 batt insulation and 6 mil polyethylene vapour barrier stayed exactly where they were, because the work stopped at the sheathing.
How long does a rainscreen stucco re-clad take?
Longer than most owners expect. The Beltline project ran roughly a year from tender to final field review, on a multi-storey wall with scaffold access and an engineer running staged reviews and hold points before the scratch coat.
What is the difference between a rainscreen and a drainage mat?
A drainage mat is a crinkled or dimpled membrane that holds a very small space, roughly 1/16 to 1/8 of an inch, between the cladding and the weather barrier. It stops hydrostatic pressure but does very little for drying. A strapped rainscreen creates a real air space that drains and ventilates, which is what a low-permeability cladding like stucco needs.
Who designed the wall in this article?
Read Jones Christoffersen Ltd. (RJC), a Calgary engineering firm, designed and specified the assembly and carried out field reviews during construction. The drawings were issued for tender in April 2025 under the National Building Code 2023 Alberta Edition.
Talk to us about your wall
CalgaryParging builds stucco assemblies to engineered rainscreen details, including the ones you’ve just read about. If your stucco is cracking, staining below the windows, or bulging near the base, the problem is usually drainage rather than the stucco itself.
Book a site visit and we’ll look at the wall, the flashings and the base of wall drainage before we quote you anything. You can browse our completed projects, read our workmanship warranty, or get to know us about CalgaryParging. We also handle masonry, brick and stone work when a wall involves more than one cladding type.